O Canada Glacier

Canada Glacier from the air
I took this photograph of the Canada Glacier from a helicopter a few days before hiking there. It gives a good overview of where we went on the hike. Lake Hoare is on the left, Lake Fryxell on the right. Halfway up the hill are the ice falls and the long tongue-like glacier that I photographed at close range in some of the pictures below.

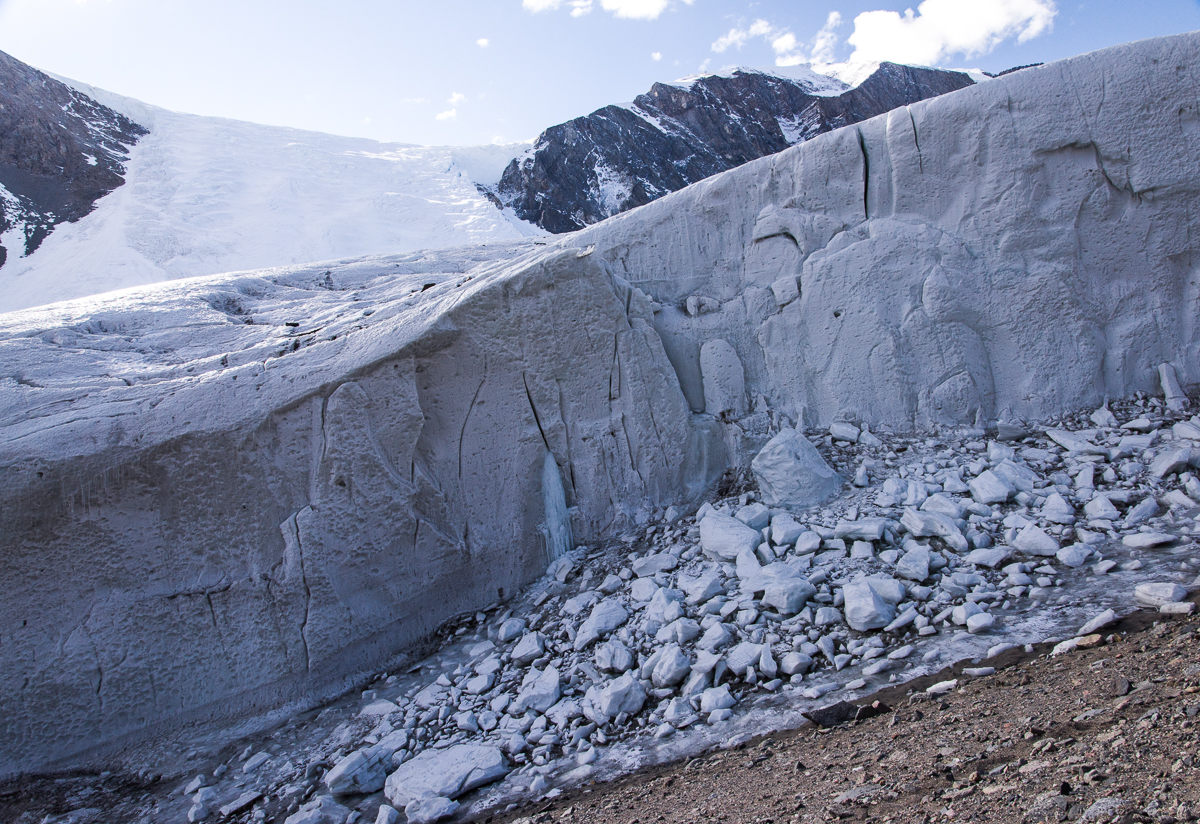
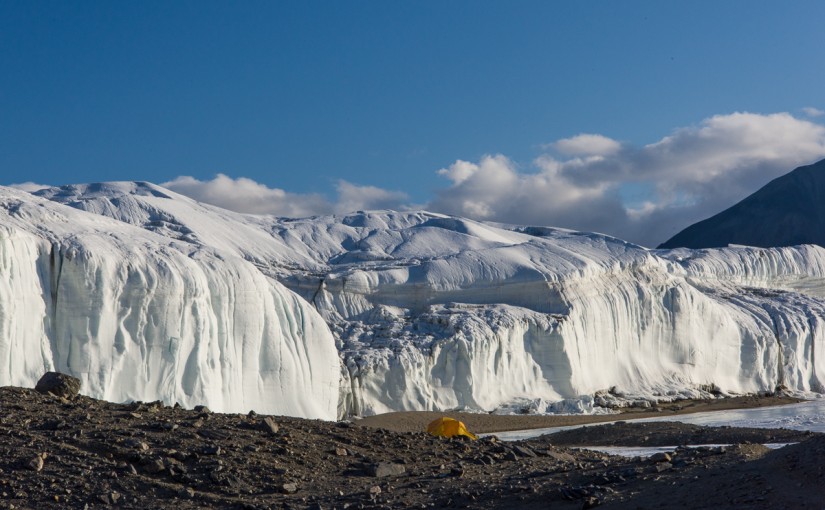
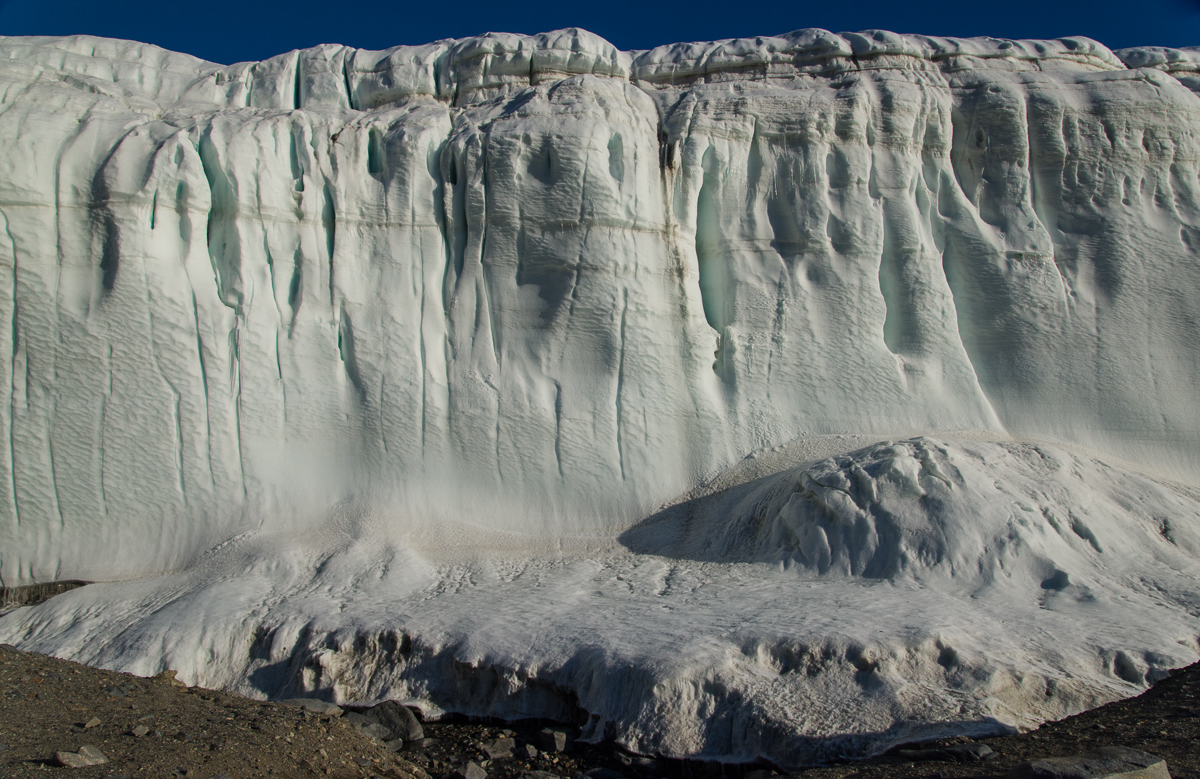
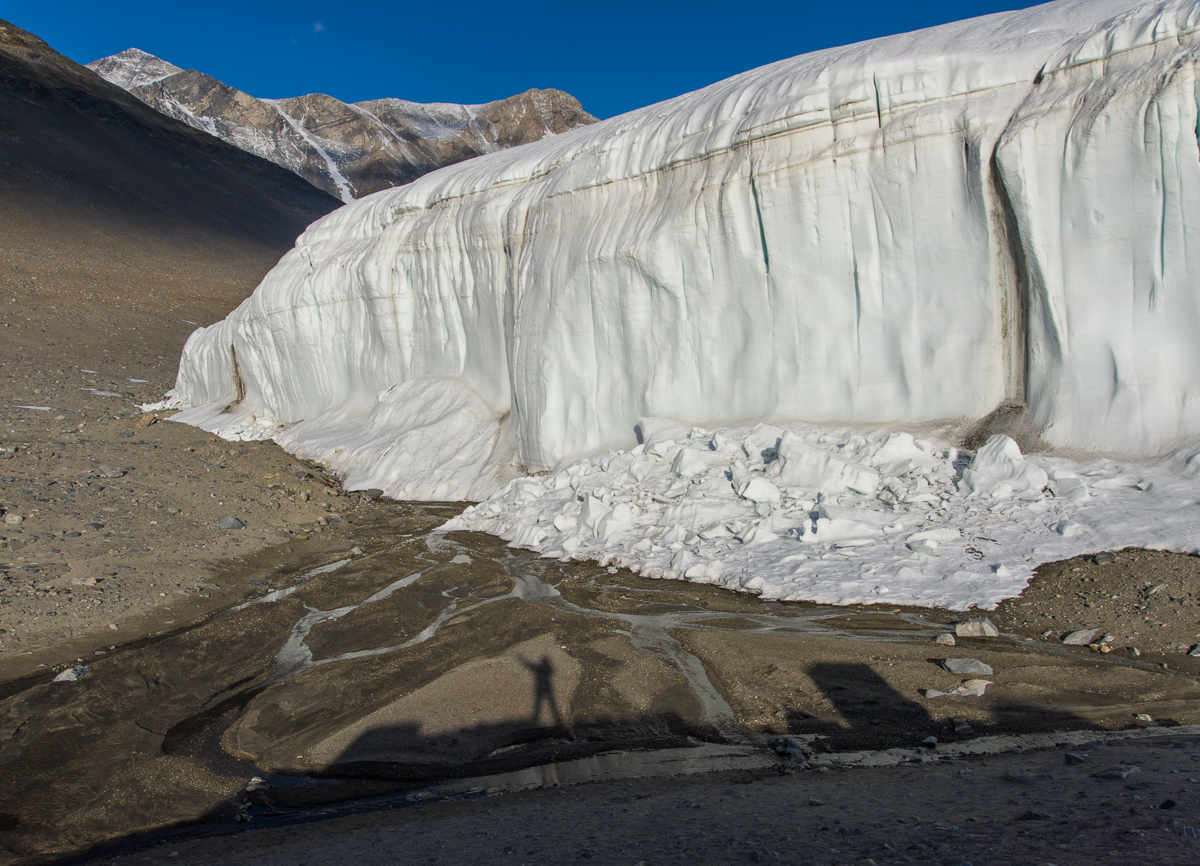
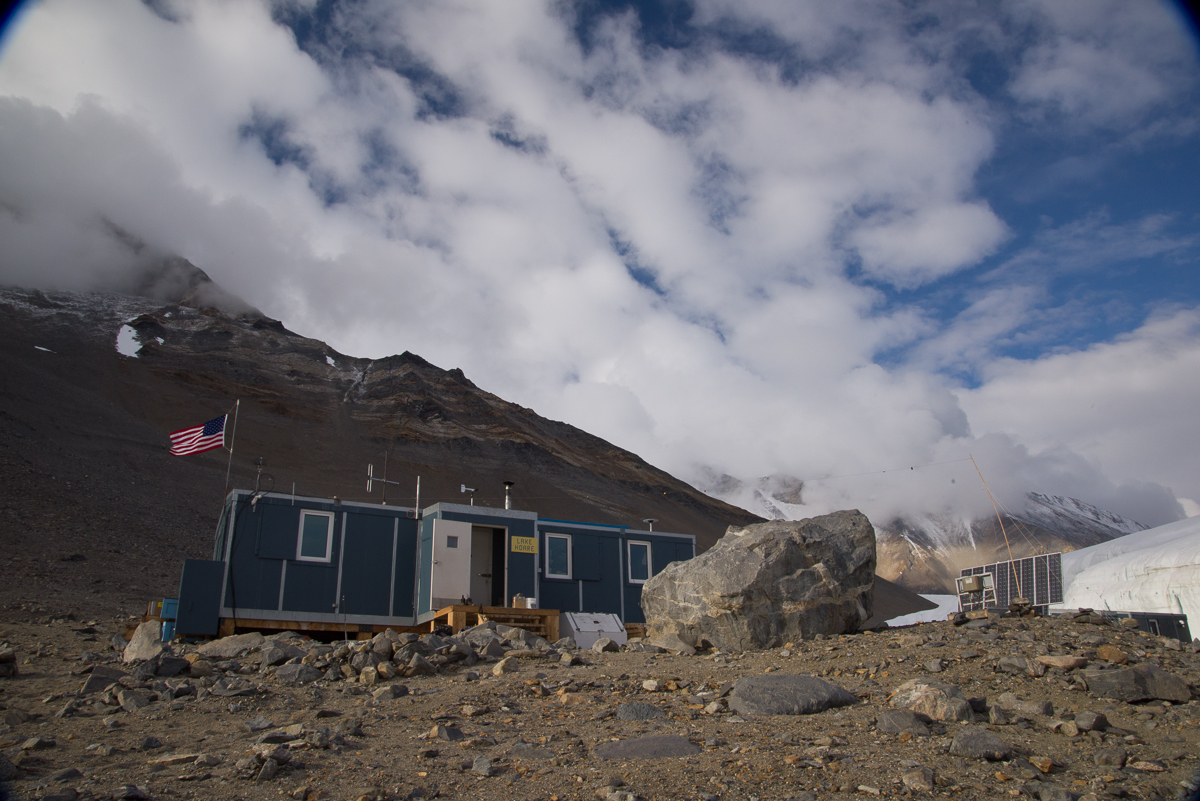
The evening of December 18th, I shook the snow off my tent from the snowstorm earlier that day and spent my first night at the Lake Hoare field camp. Though the dense fog and gray skies lingered long after the snow stopped, camp manager Rae had checked the forecast and said the skies were expected to clear overnight. Sure enough, in the morning we awoke to bright sunshine. I set out on a day hike with Renee, Rae’s assistant at Lake Hoare, to cross over the Canada Glacier and visit the eastern side, which faces Lake Fryxell. The Canada Glacier snakes down from Mt. McLennan, which is about 1,600 meters (5,250 feet) high on the north side of the Taylor Valley. The Lake Hoare camp is nestled beside the western side of the glacier, a tall wall of ice with a relatively smooth and rounded profile reminding me of an adobe house. In the course of walking over it and visiting the other side, I would see that the other side of the glacier looked very different.

Canada Glacier from Lake Hoare
Panorama of the Lake Hoare side of the Canada Glacier beside the field camp, a smooth wall of gently rounded forms punctuated with vertical slits of deep blue ice, the very top of which is about 10 meters (32 feet) high. Beside the lake, a section of the glacier has crumbled and fallen into a pile of ice chunks. The glacier was named during Robert F. Scott’s 1910-13 expedition in honor of a Canadian who was a member of the team, Charles S. Wright.

Renee is an avid hiker who runs a backcountry lodge at Glacier National Park in Montana during the summer. Before we left, she told me, “I always hike with poles,” and offered to let me use one of hers. In all my years of hiking I had never had used walking sticks or poles; they’d struck me as just another thing to carry. But I figured this was not familiar terrain and if as strong a hiker as Renee relied on them, I’d follow her lead.

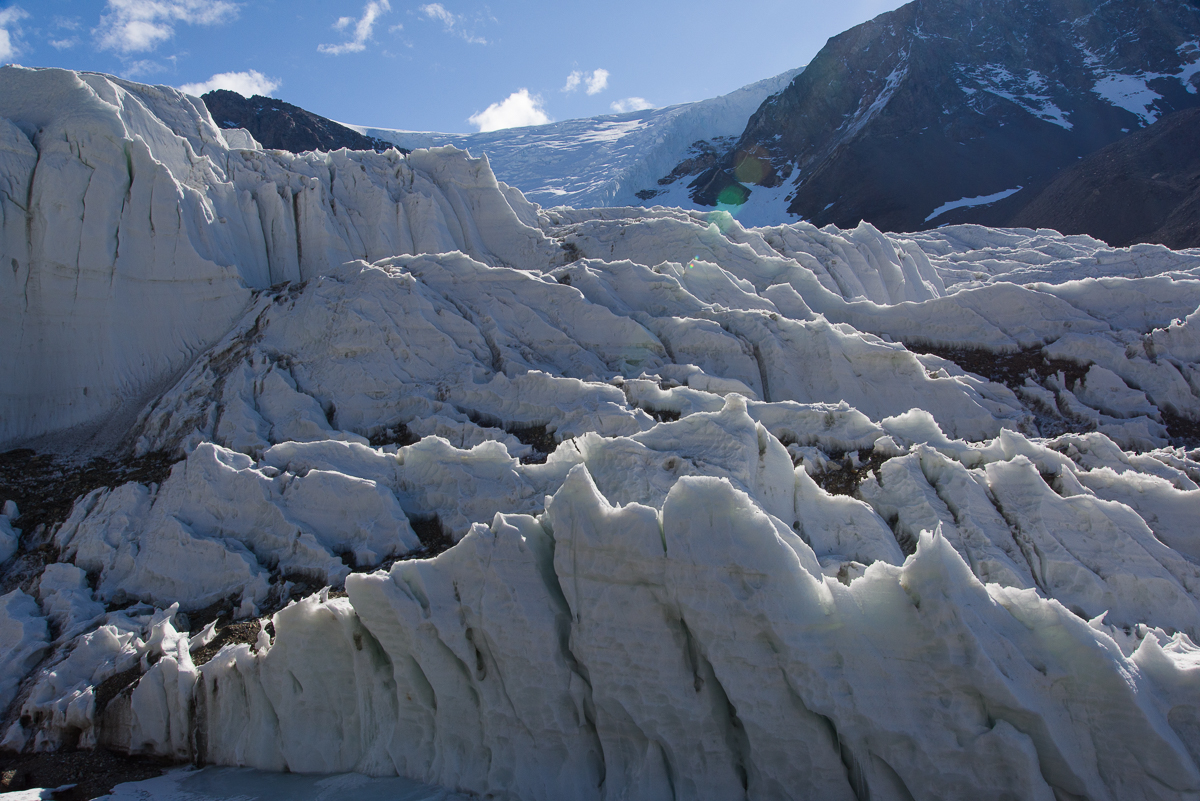
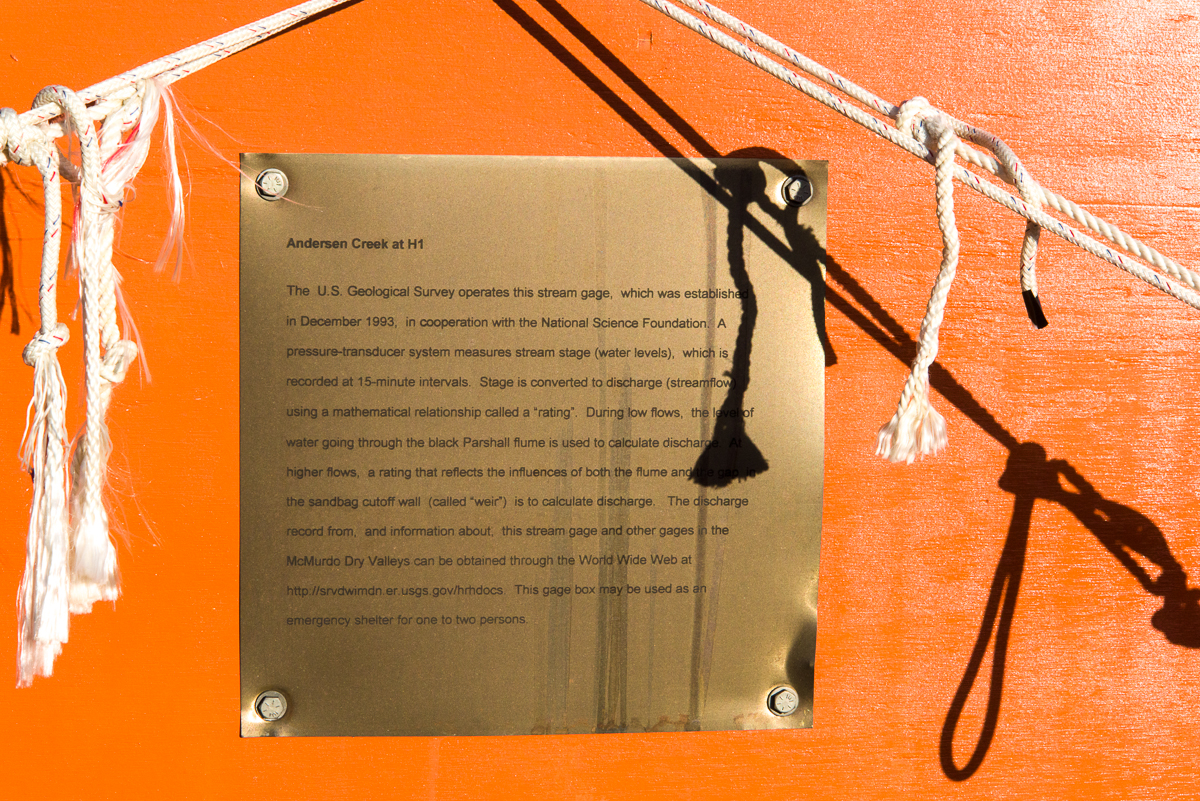
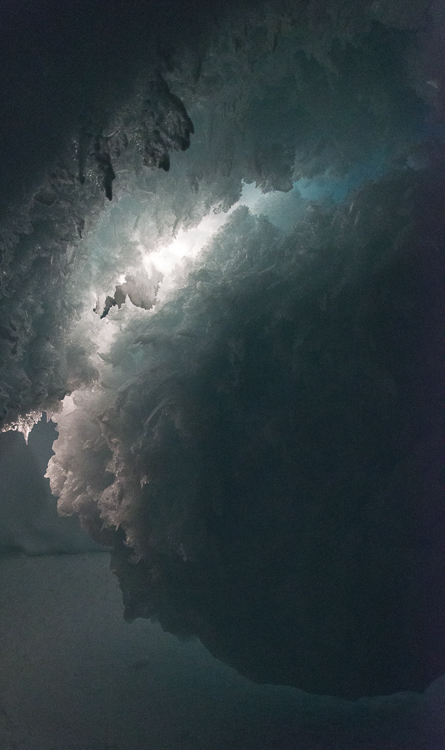
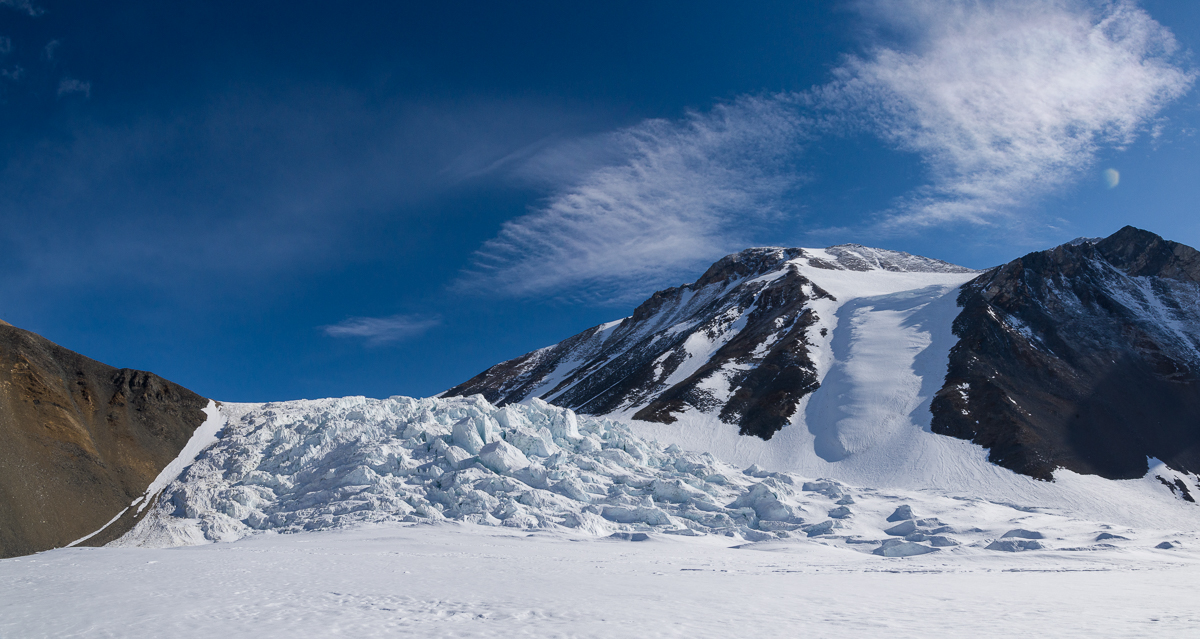
We started up the steep rocky moraine beside the Canada Glacier with the stream ecology team, who were planning to take water samples at various locations. Beside the glacier are piles of large and medium sized rocks and the Andersen Creek, fed by meltwater that comes off the glacier, but it was still so cold and shady in that area that the stream sampling team was having trouble finding thawed meltwater to collect. When we came to an area where the top of the glacier flattened out, we parted ways as they headed for another of the sampling spots. Renee and I put crampons on our boots and headed toward the ice falls, a slope where gravity had creased the glacier and separated it into rows of irregular boulder-sized chunks of blue ice. To the right of the falls, an enormous tongue-shaped section of the glacier clings to a steep face of Mt. McLennan.

Canada Glacier, Below Ice Falls
When we got on top of the Canada glacier, we approached the ice falls. We got close enough for me to photograph it, but it’s not safe to walk up to the edge.
Canada Glacier
To the right of the ice falls, this enormous tongue-shaped section of the glacier flows down a steep rocky slope.

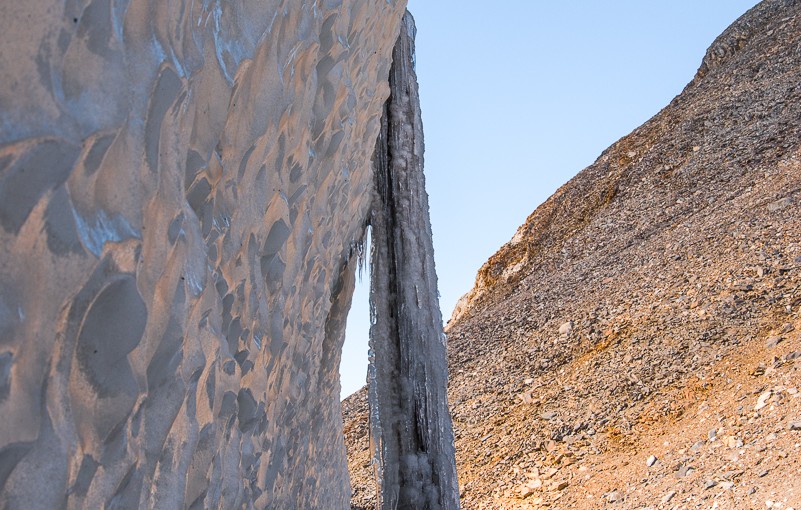
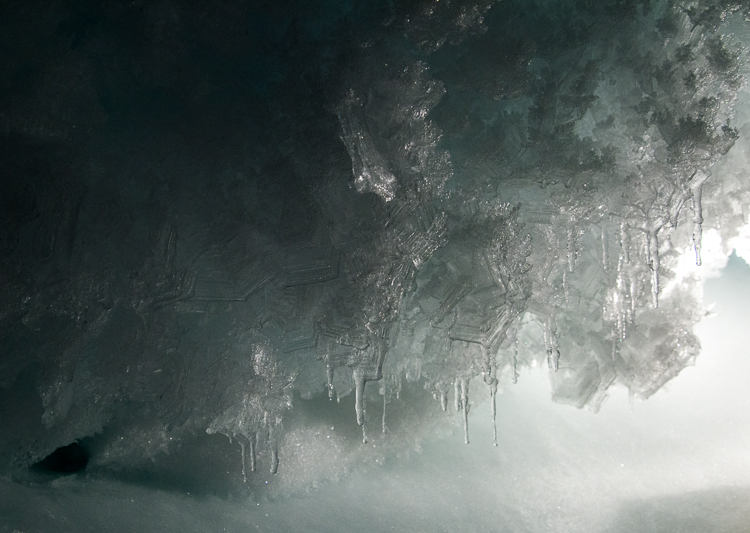
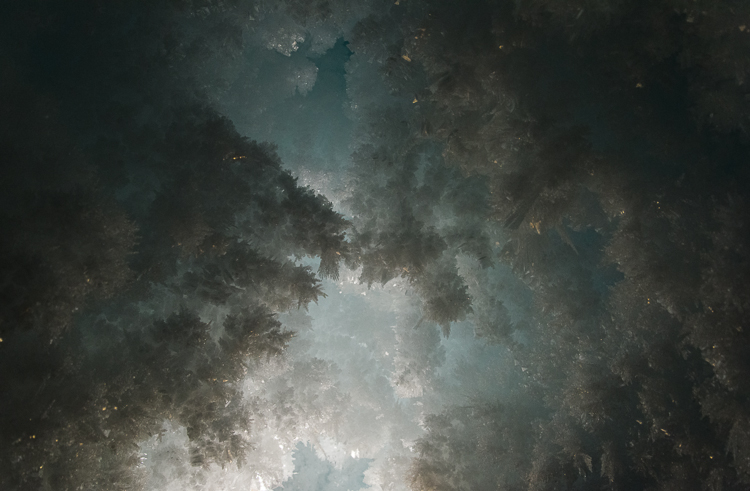
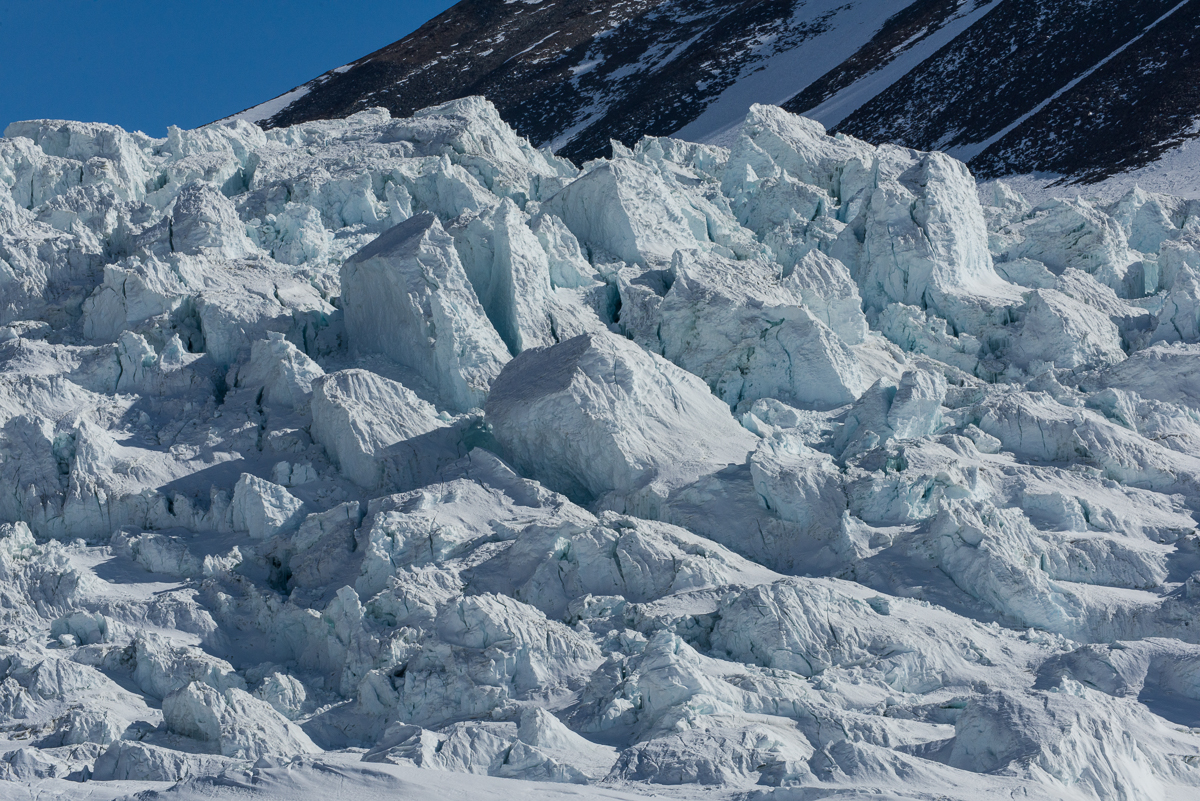
Once we were on top of the glacier, I quickly discovered why climbing poles aren’t, um, pointless. The layer of about four inches of snow from the day before lay on top of the glacier, covering areas of thin ice where your foot could punch through into a hollow spot that could be anywhere from a few inches to a couple of feet deep. Underneath could be rocks or small melt pools. This made traversing the area more challenging than usual, when the hazards are more visible. As she walked, Renee rapidly jabbed at the ice ahead with her pole. If the pole punched a hole in the ice, then she’d pause and continue probing until she found a solid spot before taking the next step. I followed suit. Here is a detail of the ice falls, taken with the assistance of a telephoto lens:

Canada Glacier ice falls detail
Ice sculpture: enormous chunks of blue ice form creases, ridges and terraces on the hillside.

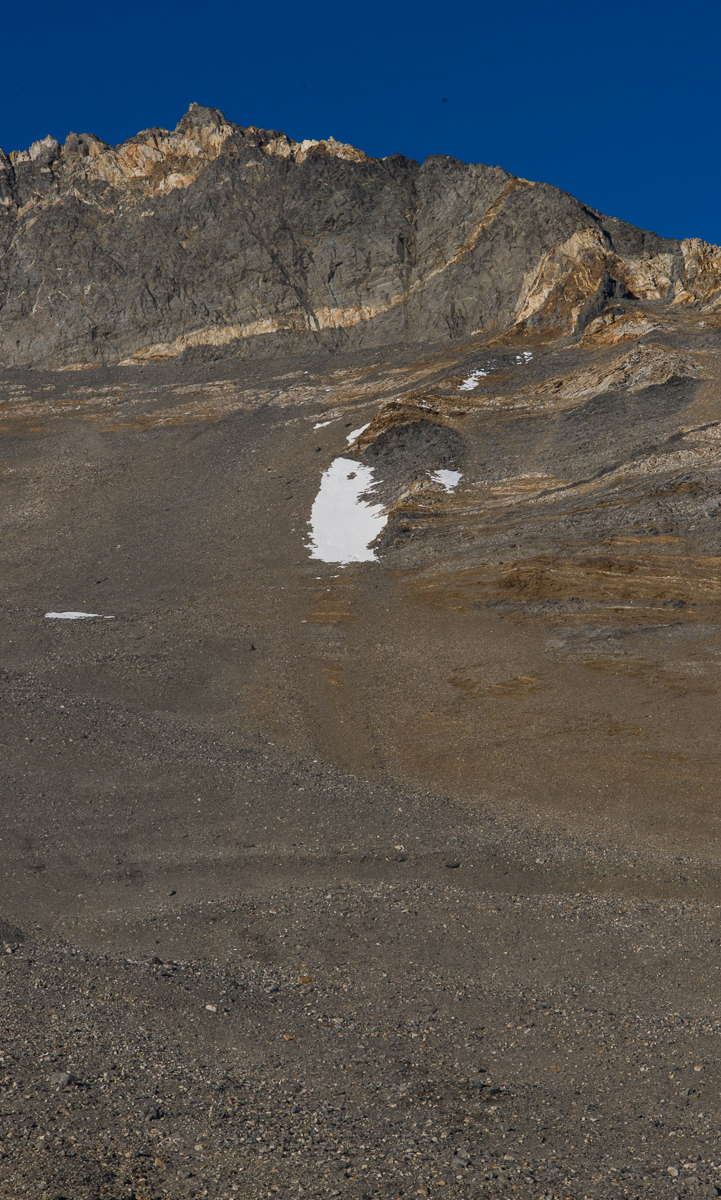
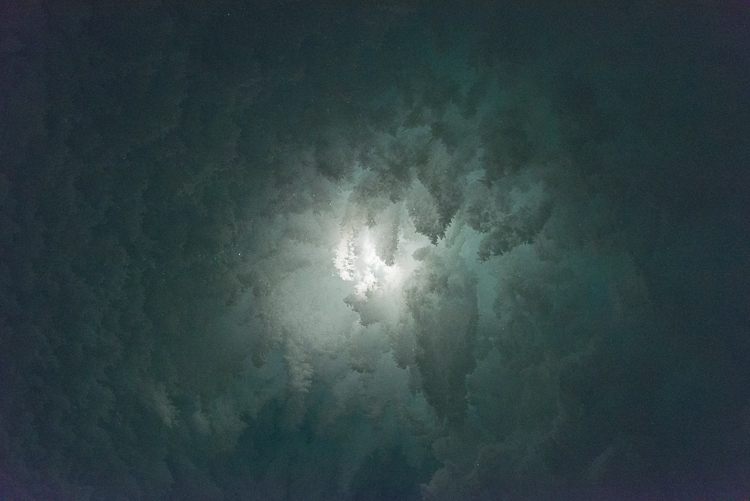
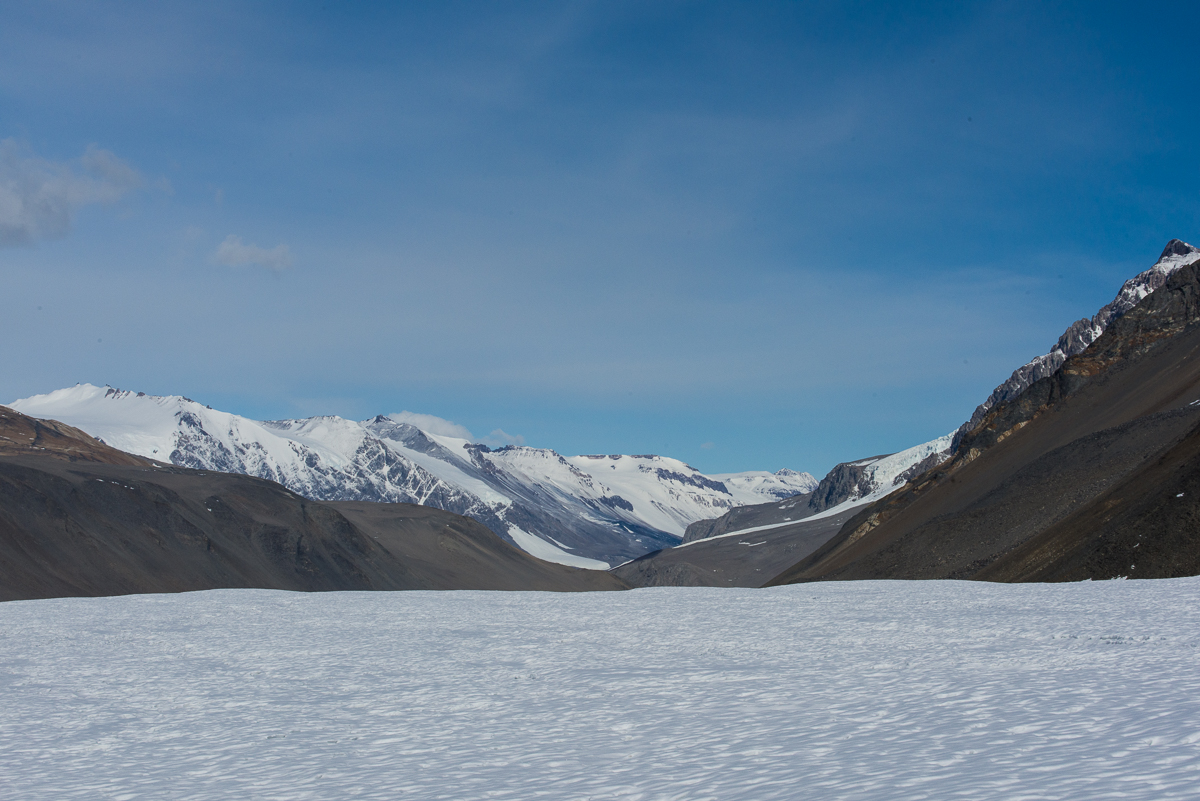
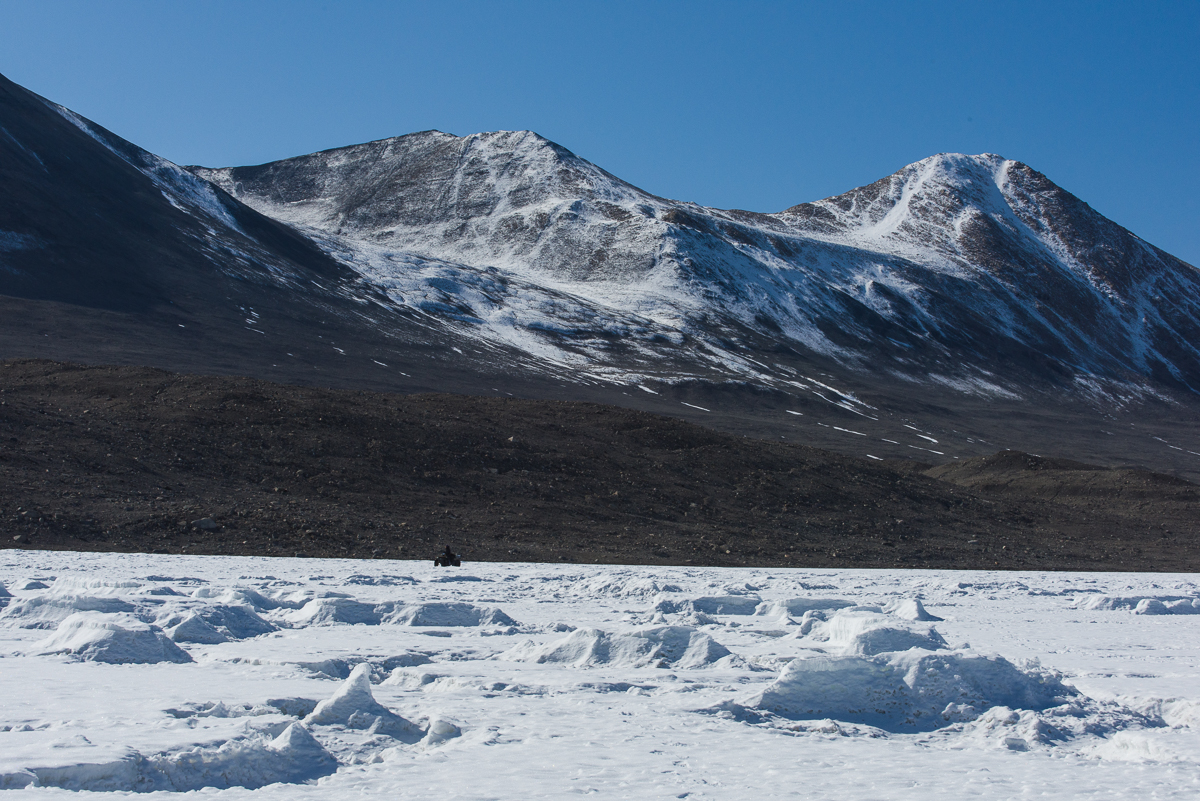
After photographing the falls, we continued over the top of the glacier, carefully poking the surface with our poles to avoid the gaps until we stepped off the glacier onto the rocks and gravel on the other side. We looked for tracks where the stream ecology researchers had walked before, but couldn’t always find them, so we had to pick our way carefully, especially when we got close to the edge where the glacier tapered off onto the gravel-covered hill. To the south, there were thin clouds in the sky and the previous day’s snowfall gave the opposite hillside the texture of a tapestry:

Kukri Hills, Taylor Valley opposite Canada Glacier
On the south side of the valley across from the Canada Glacier, the Kukri Hills were dusted with the previous day’s snow. Before that, they were mostly bare and brown.

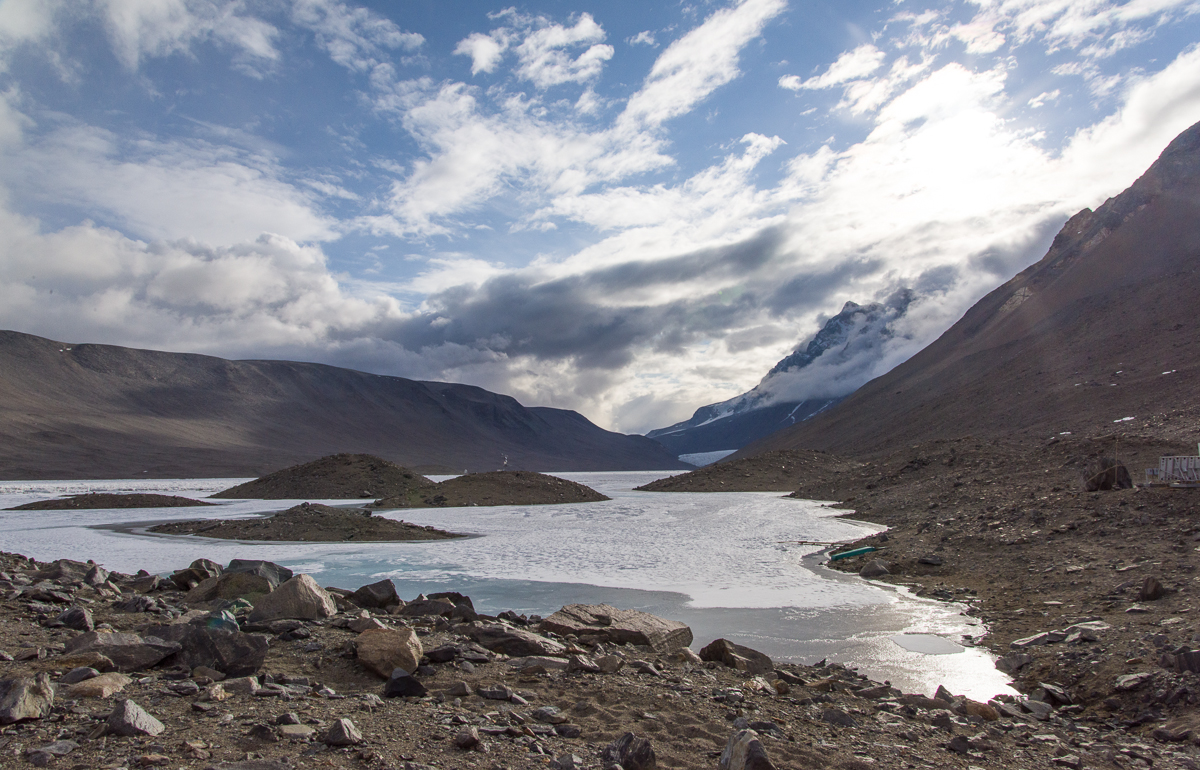
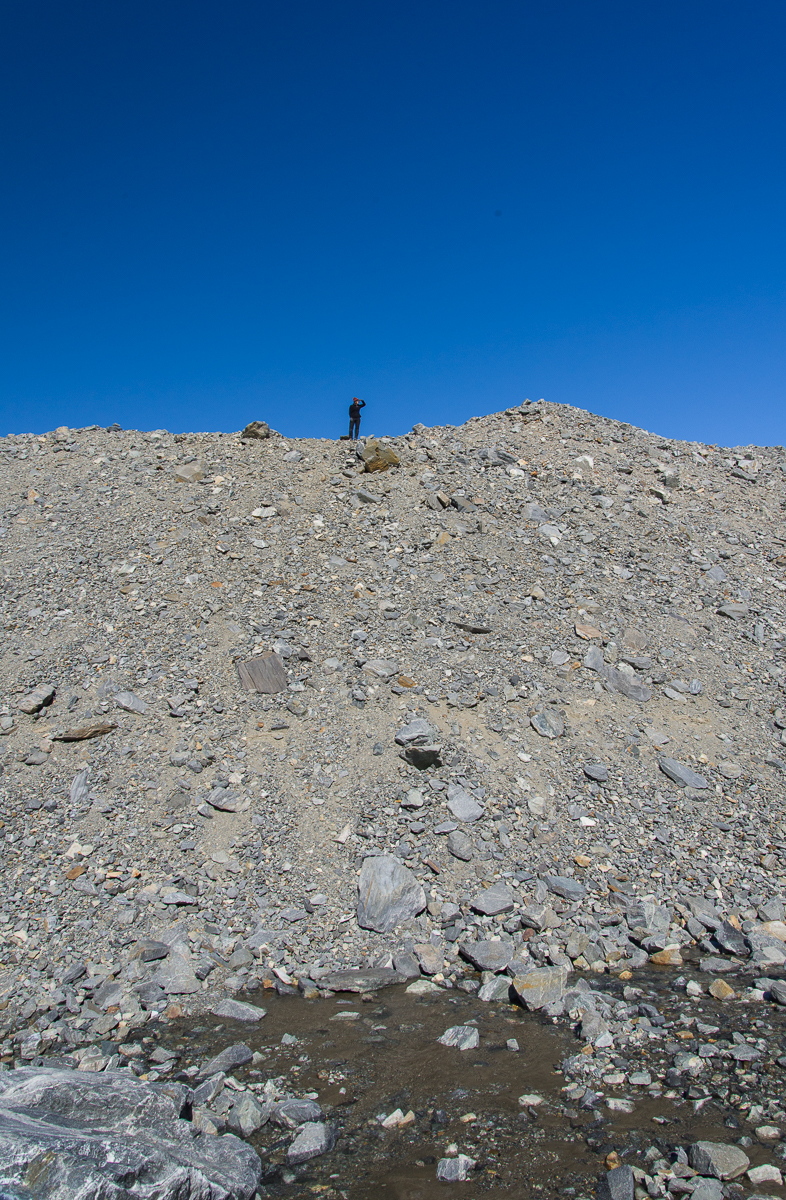
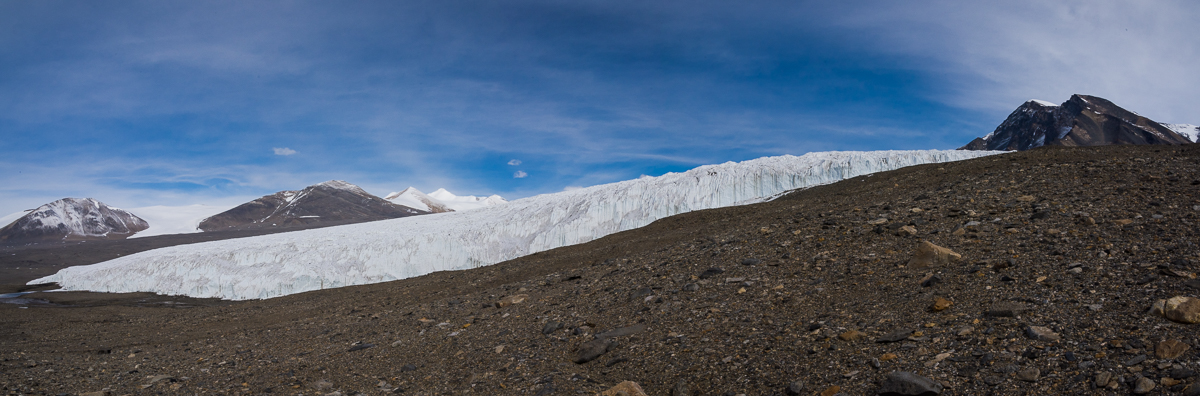
Looking toward Lake Hoare while standing on top of the glacier you can take in its scale. We had walked up from the right:

View of Taylor Valley from on top of Canada Glacier
View of Taylor Valley from on top of the Canada Glacier.

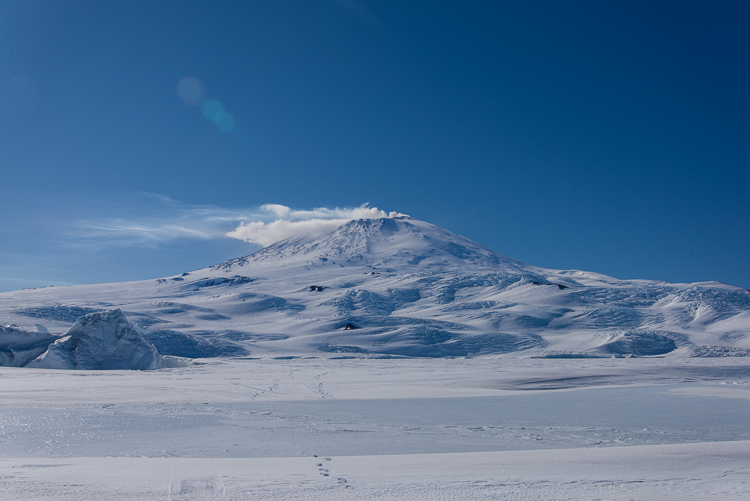
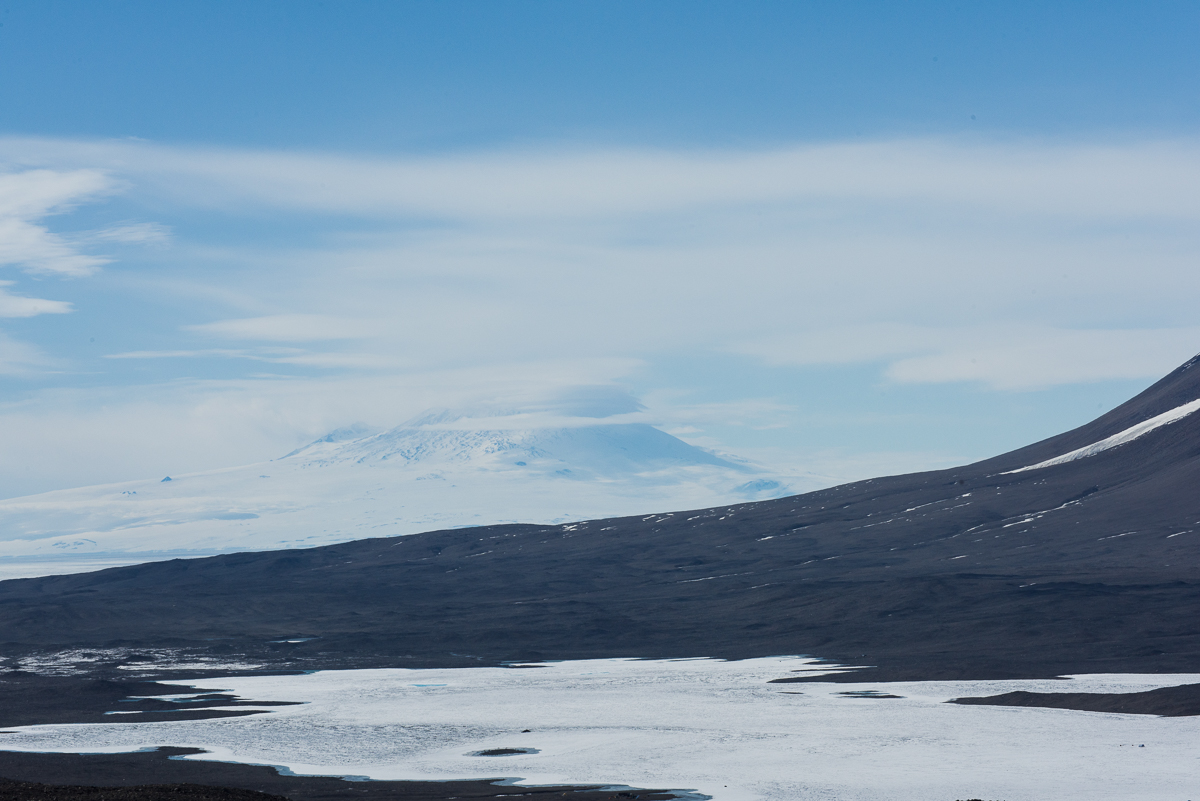
Our next destination, Lake Fryxell, lay ahead to the east. We were up high enough to see the ice-covered summit of the Mt. Erebus volcano in the haze across McMurdo Sound about 13 miles away. After crossing the glacier to the gravel hill on the other side, we ate lunch in a sheltered spot, then headed downhill towards the Lake Fryxell field camp. Our plan was to get in the ATV that stays on the sea ice during the research season and double back across the lake ice to have a closer look at the Fryxell side of the Canada Glacier.

Mt. Erebus and Lake Fryxell from the Canada Glacier.
Lake Fryxell from the Canada Glacier. The 12,448-ft. summit of Mt. Erebus, about 13 miles away, can be glimpsed through the haze.

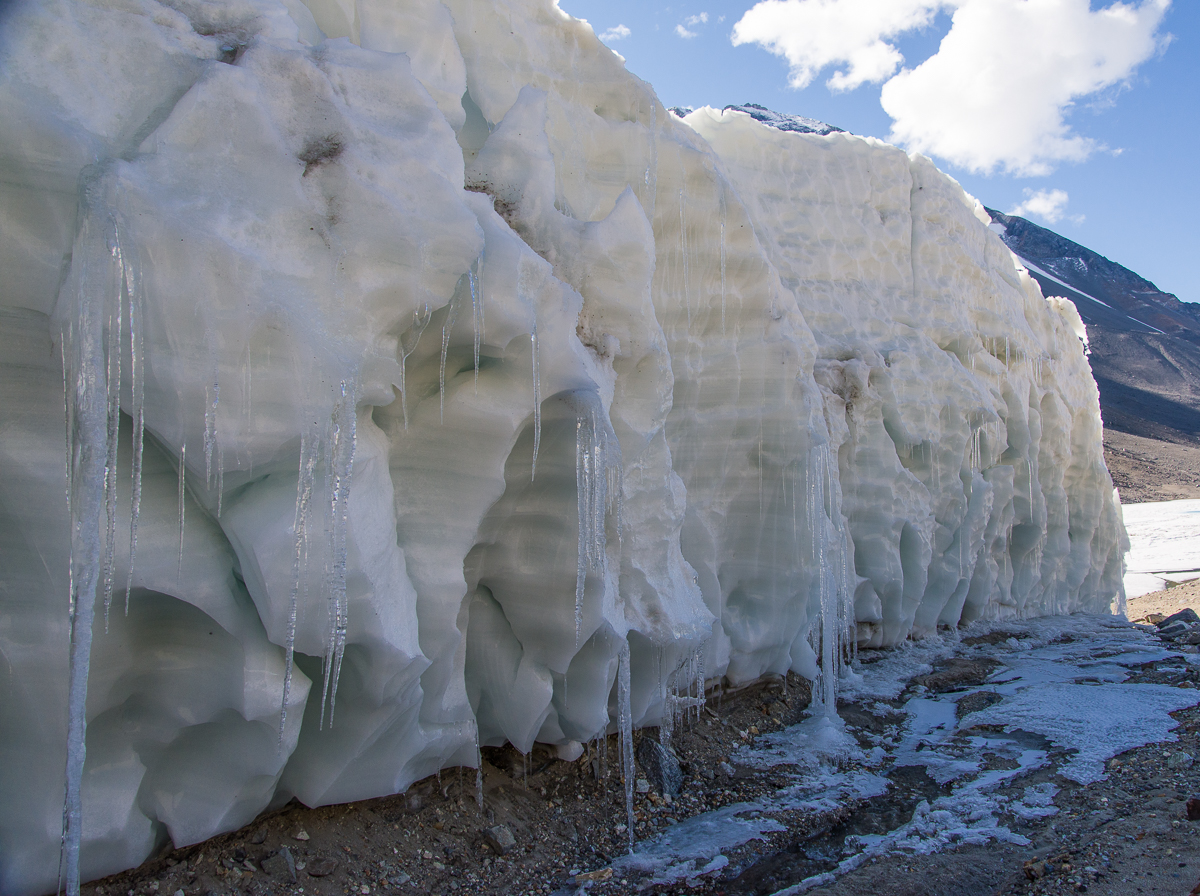
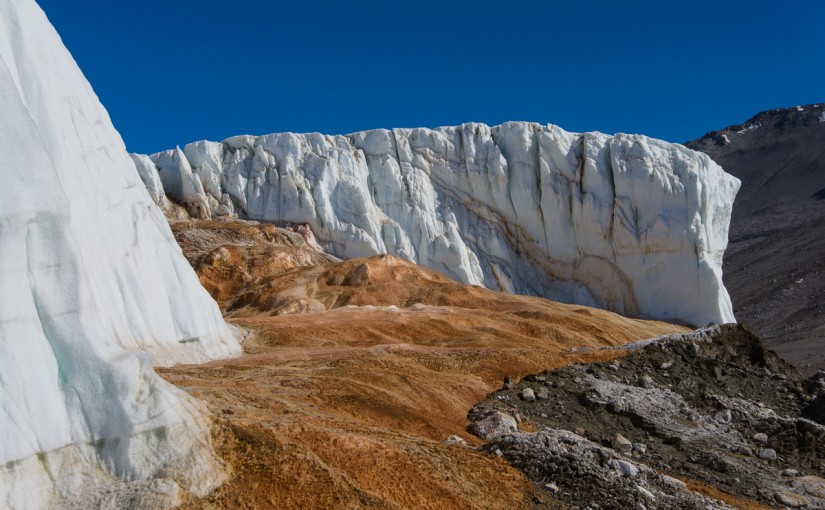
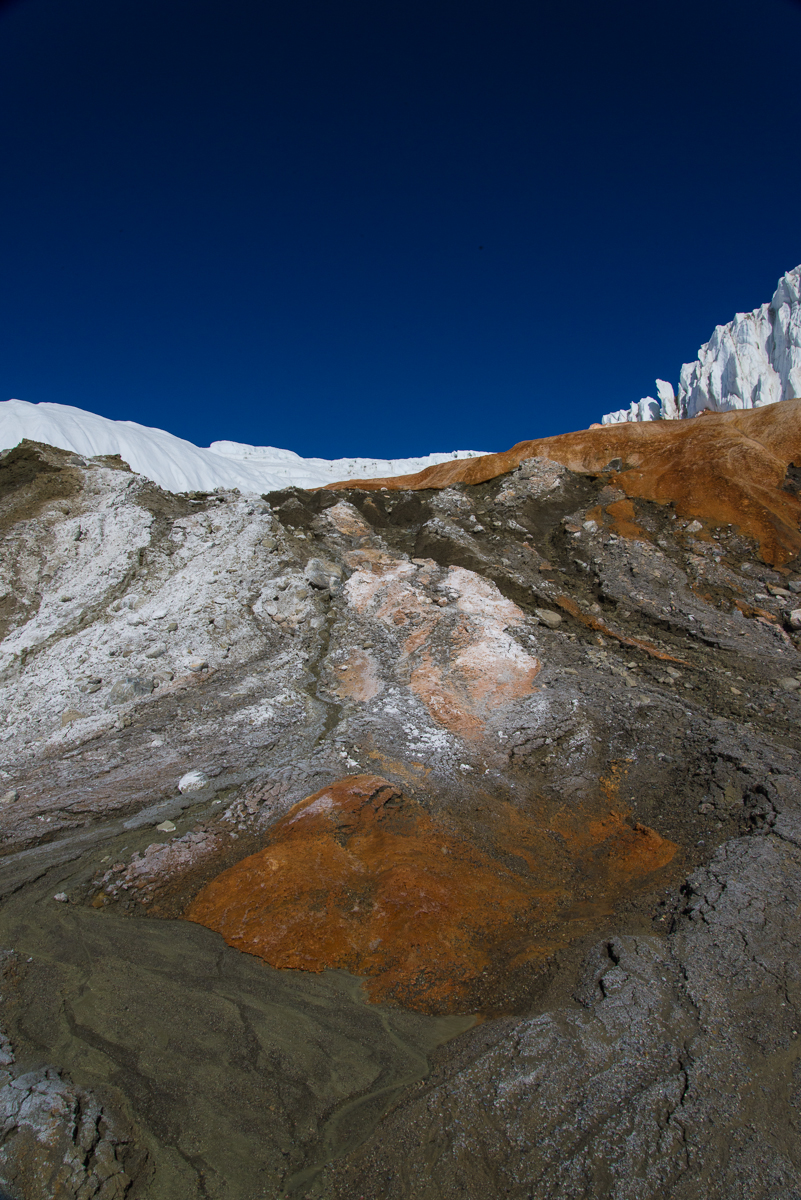
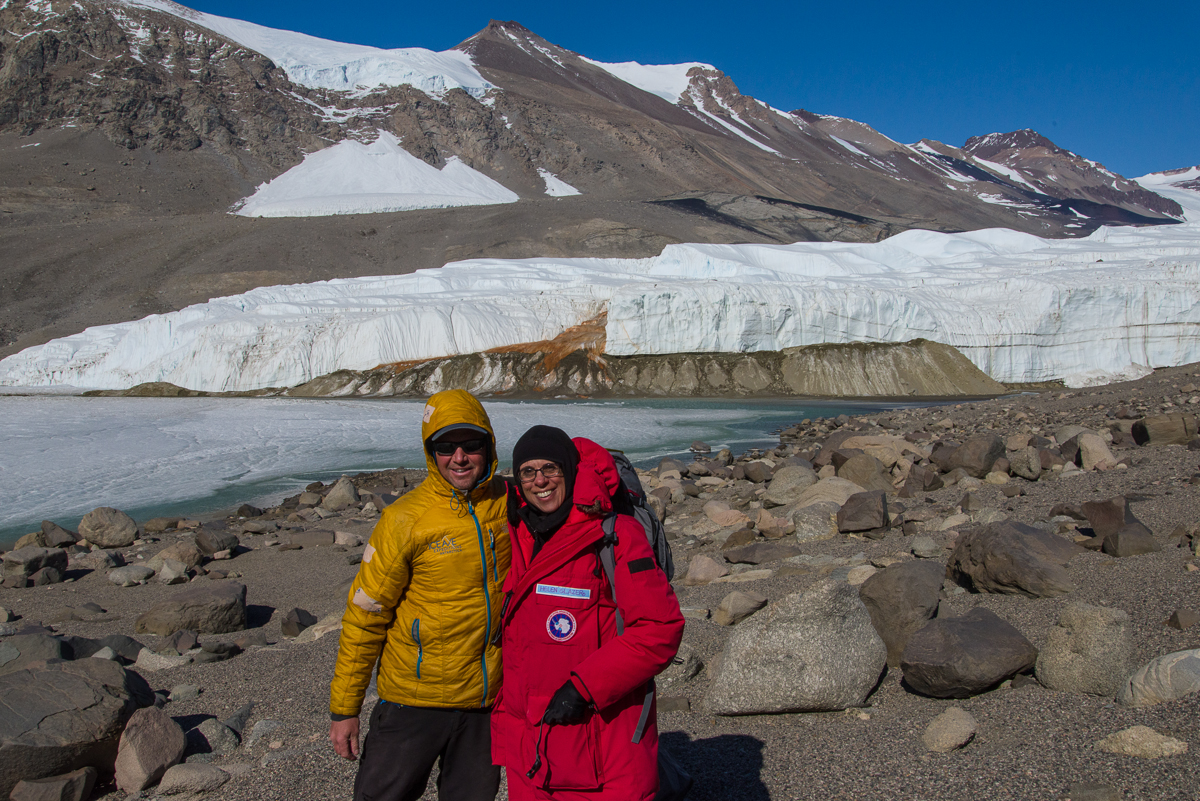
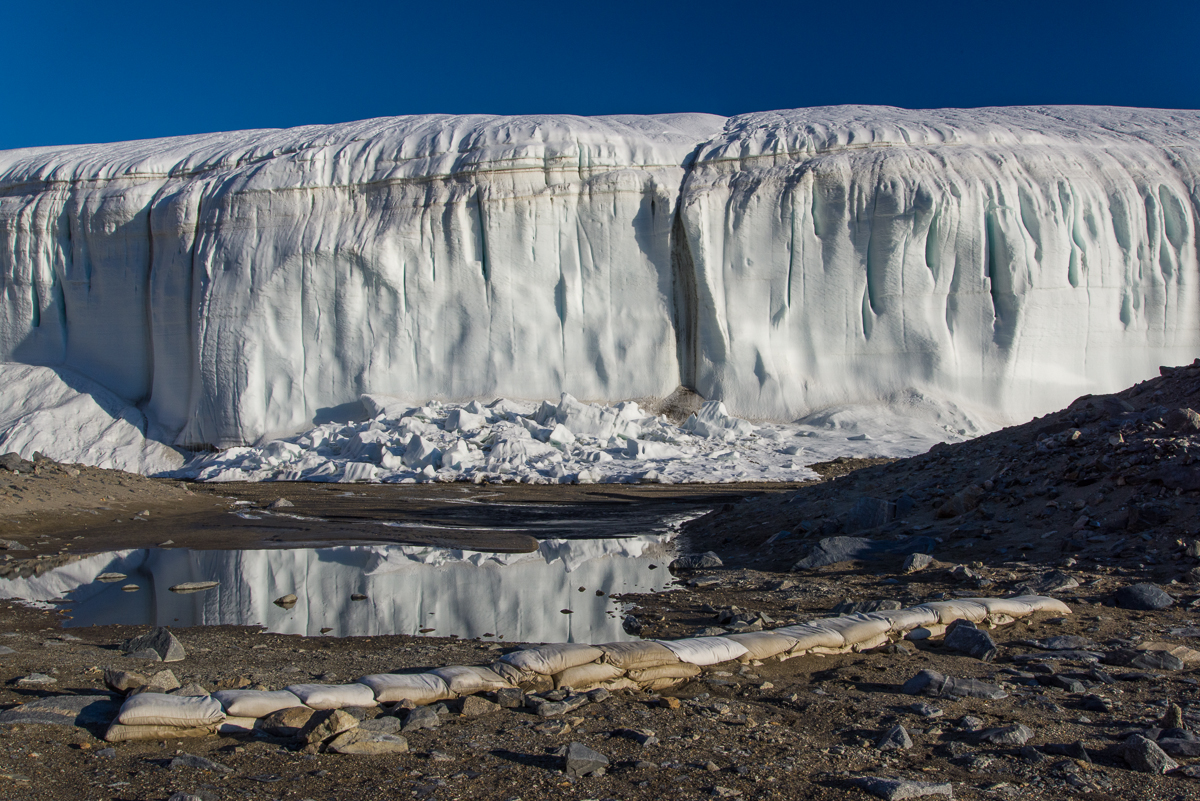
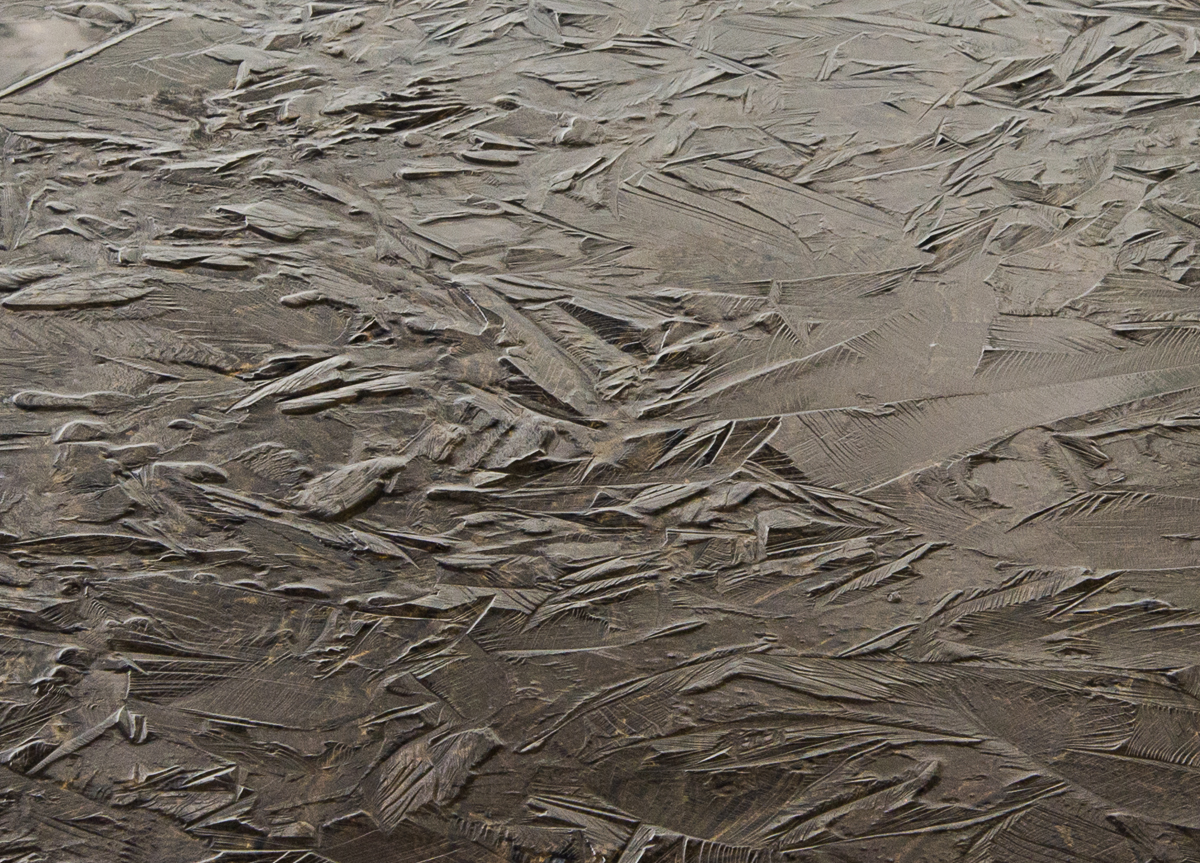
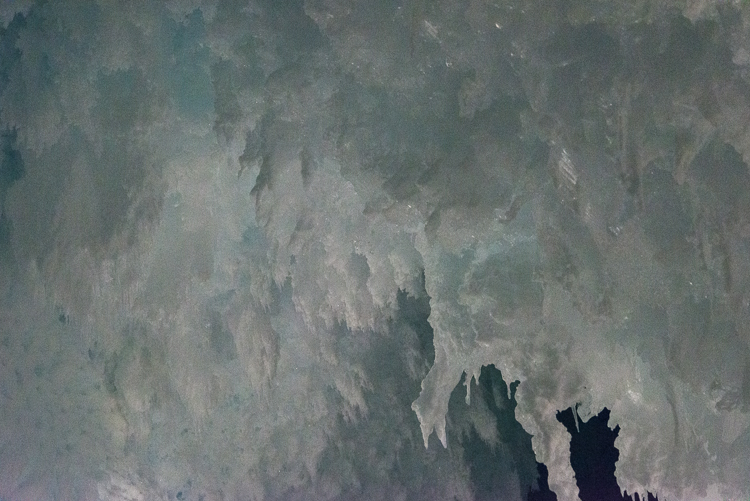
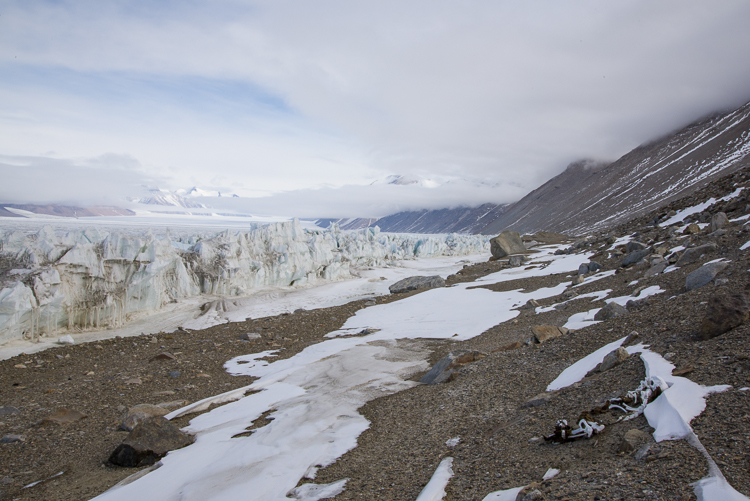
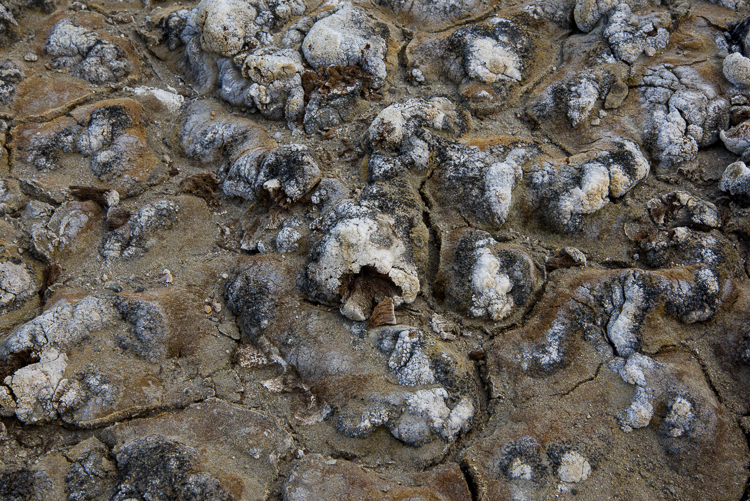
In order to protect the ecology of the streams which run off the Canada Glacier into Lake Fryxell, approximately one square kilometer of the hillside adjoining the glacier and the lake shore has been designated an Antarctic Specially Protected Area (ASPA). Although it looks like just more of the same rocks and gravel you can see for miles in every direction, its relatively sheltered location and the meltwater coming off the glacier makes this tract one of the best places to find life in the polar desert, especially bryophytes (e.g. mosses) and algae. The tiny plants are freeze-dried most of the year, but come briefly to life during the austral summer. To enter one of five ASPAs in the McMurdo Dry Valleys, you must be issued a permit by a national authority, which for the U.S. is the National Science Foundation. I obtained a permit to enter the Blood Falls ASPA but not the Canada Glacier one. The NSF staffer who issues the permits assured me I would be able to get close enough to the glacier from the lake to photograph it and that there was no reason for me to enter the protected site. When I got there, I could see her reasoning. That portion of the glacier isn’t even particularly interesting from a visual standpoint:

Canada Glacier from Lake Fryxell side
One square kilometer adjoining the Lake Fryxwell side of the Canada Glacier on the lower part of the hillside (to the left in the above photo) is off limits to all except scientists with government-issued permits.

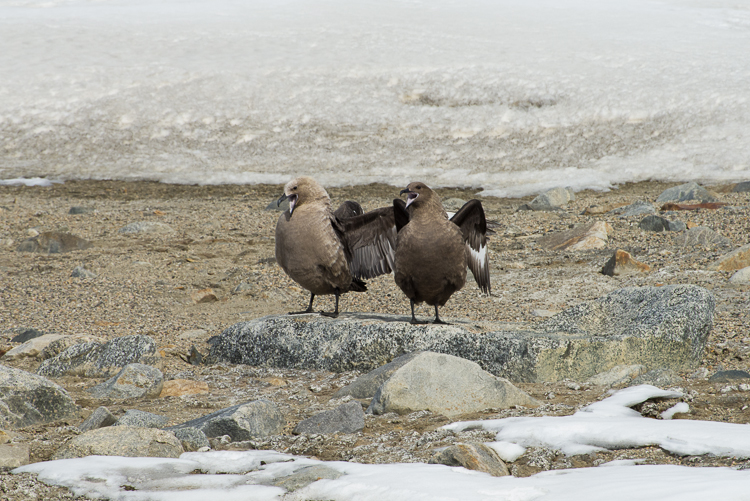
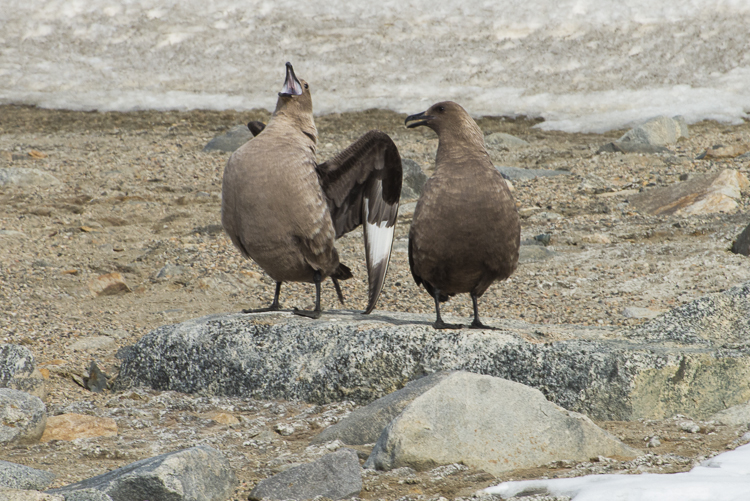
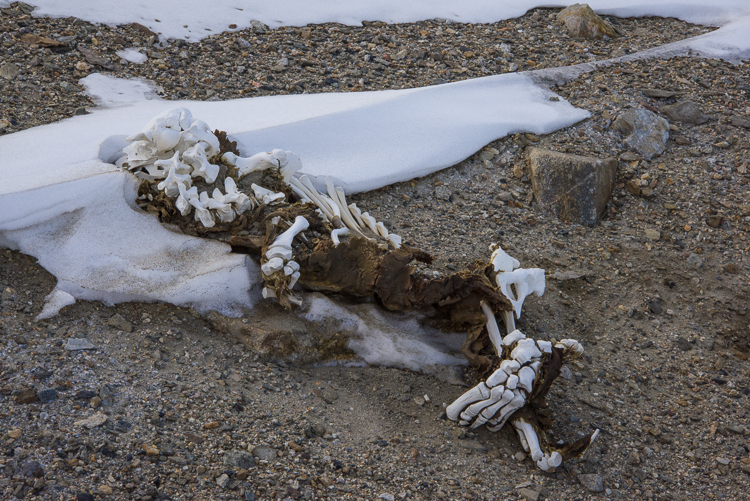
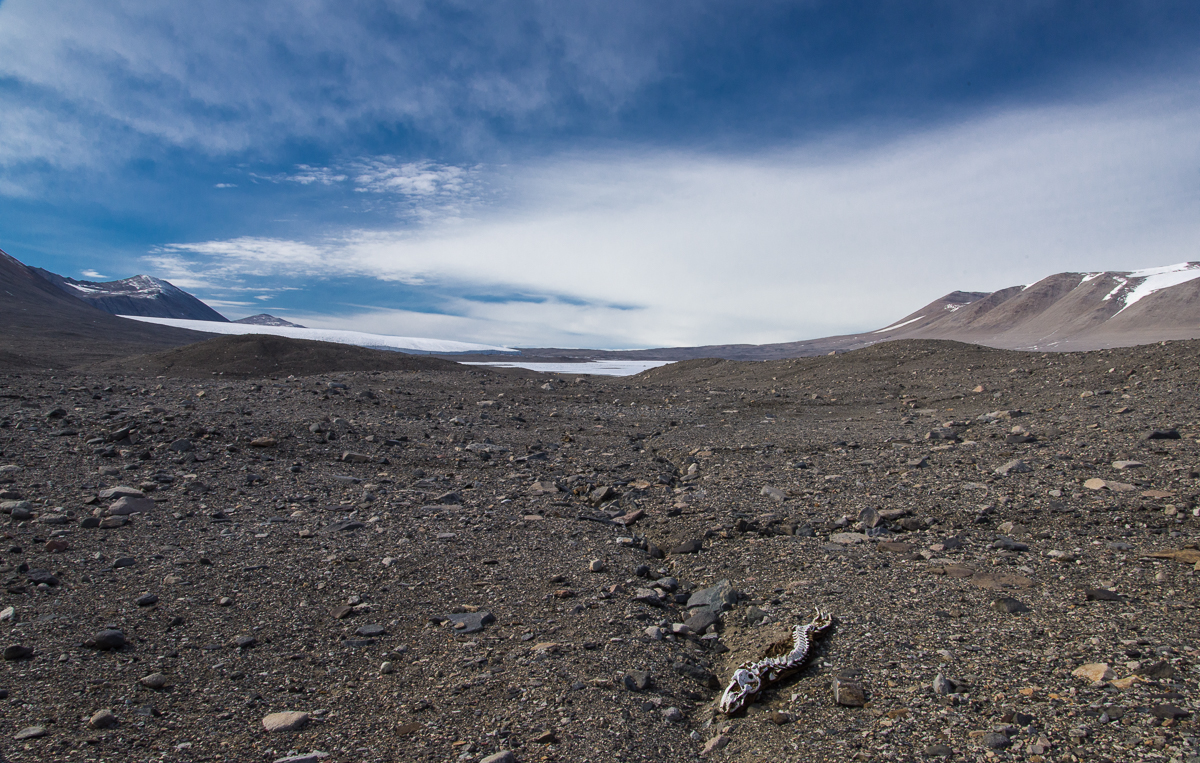
Hiking across the gravel to Lake Fryxell we encountered the first of two mummified seals. I made a tentative ID of the one below as a crabeater seal, based on its teeth. The three types of seals found in this part of Antarctica — leopard seals, Weddell seals and crabeaters — all have different shaped teeth.

Mummified seal near Canada Glacier
On the way from the Canada Glacier to the Lake Fryxwell camp we encountered a mummified seal that was mostly reduced to a skeleton. The animal must have been very disoriented as it laboriously crawled over the land, because it died headed in the opposite direction from the sound after traveling several miles. In the distance the small white wedge in the center is Lake Fryxell. Beyond that on the left, is the Commonwealth Glacier.

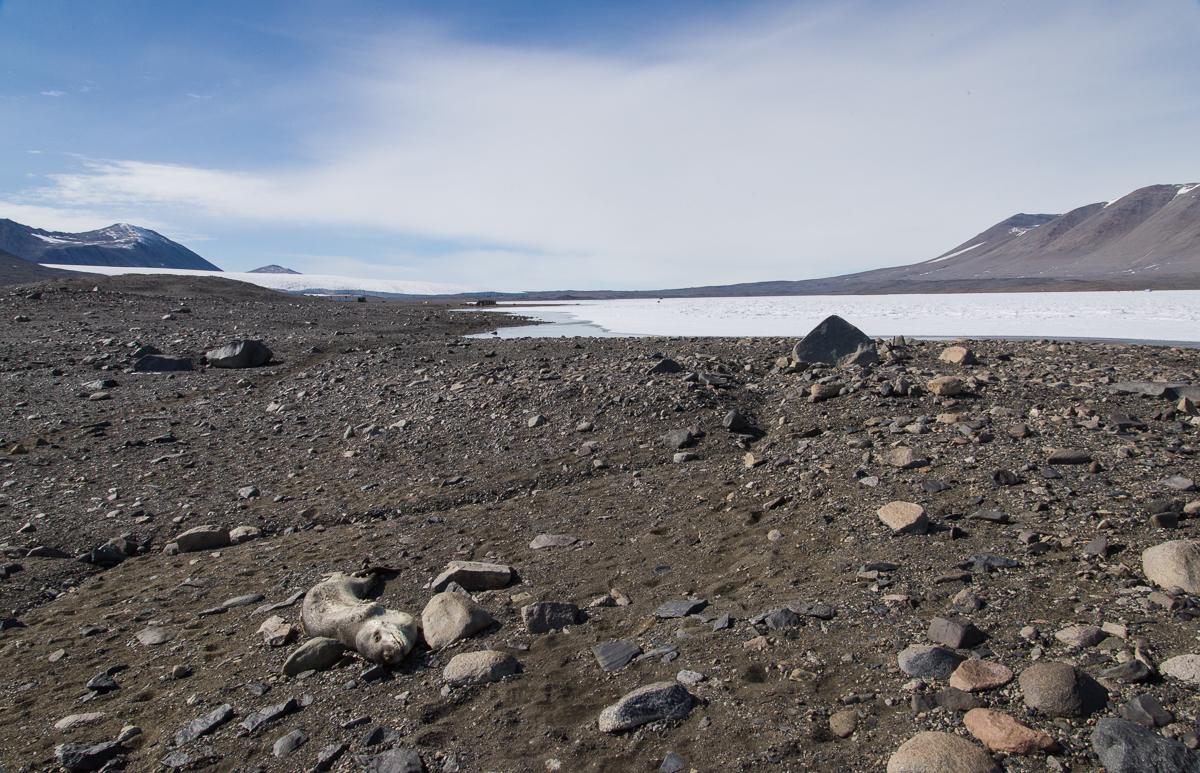
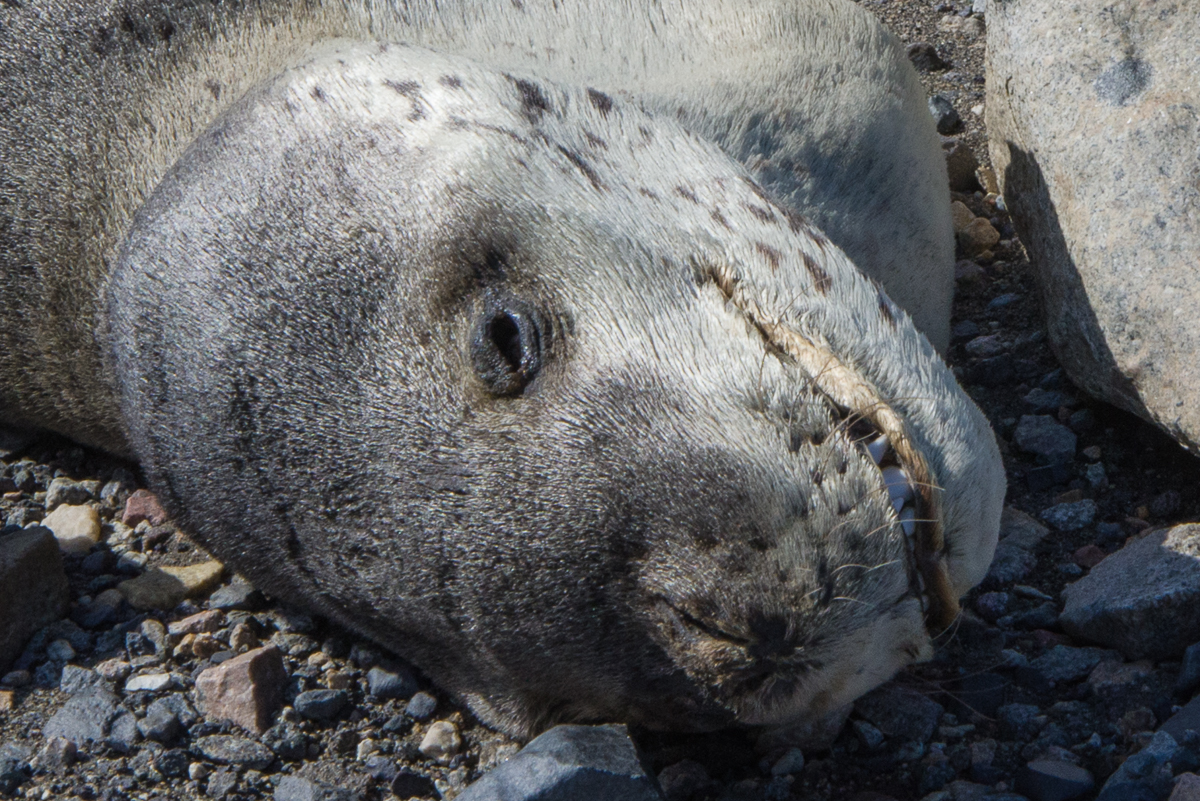
The next seal we encountered was easily identified as a leopard seal, because due to the freezing temperatures and the lack of organisms such as bacteria and insects, it still had its fur, even though, according to the people at Lake Hoare, it had died there about three years ago. Leopard seals are ferocious predators — when I asked Sam Bowser if his dive team ever saw them at New Harbor, he responded, “No! And I wouldn’t want to.” Leopard seals could attack the divers. Weddell seals, which the divers often do see, are essentially harmless and non-intimidating, even though they weigh over 1,000 lbs. But even a young leopard seal that had drawn its last breath a few years ago looked somewhat sinister with it’s long powerful jaw.

Between the Canada Glacier and Lake Fryxell
Between the Canada Glacier and Lake Fryxell we approached a more recently deceased seal. It’s difficult to determine how long most of the mummified seals of the Dry Valleys have been there, but because this area is frequently traversed by scientists during the research season, they know it showed up around three years ago.
Mummified leopard seal
Close-up of the seal shown in the previous photo. After three years, it has hardly decomposed and still has its fur. Leopard seals are fierce predators and you would not want to get this close to a live one.

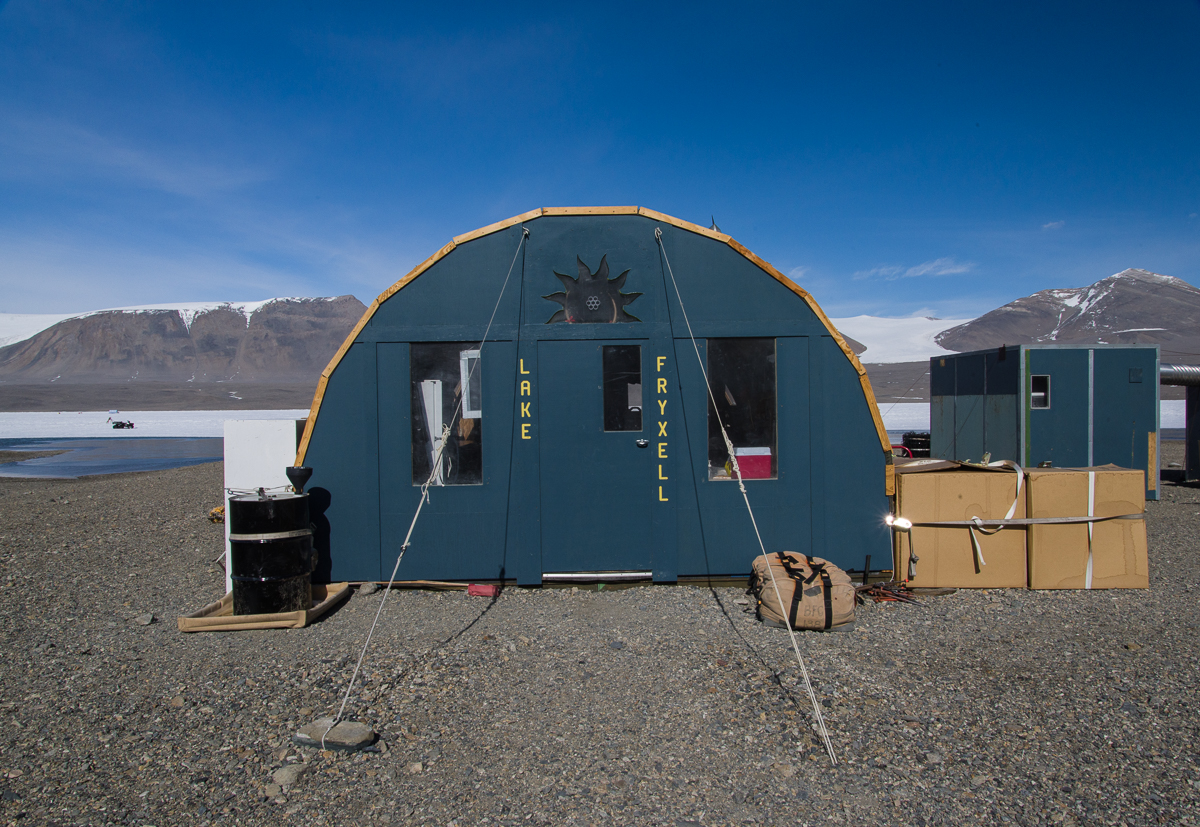
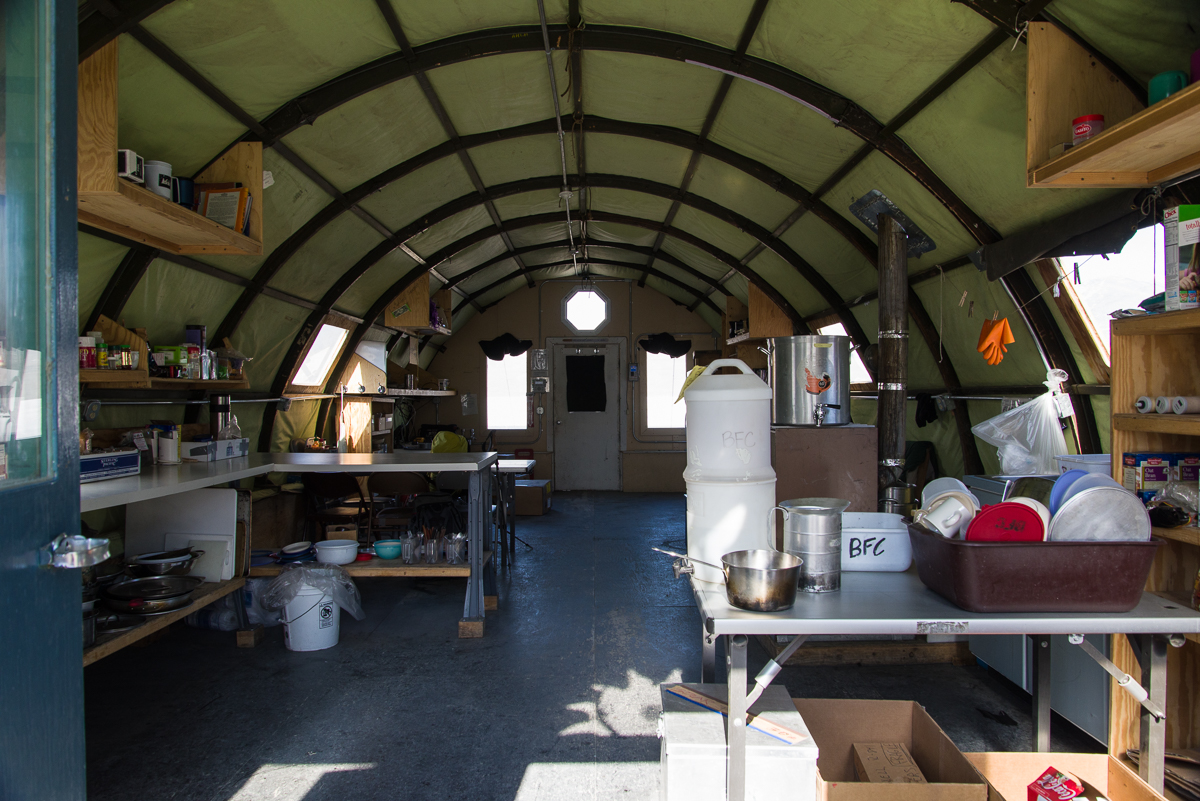
Eventually, we reached the Lake Fryxell Jamesway hut. Nobody was staying at the field camp, though a team of carpenters were expected to return shortly to resume work building a new hut on the site, of the same design as the one at Lake Hoare. When they’re done, the Jamesway will be dismantled, and these photos will be documents of a vanished era. The Lake Bonney Jamesway will be replaced next. There’s something cool and retro about the Jamesways, especially the quirky improvisations and embellishments added over the years as teams of researchers have come and gone, but whatever the boxy Lake Hoare hut lacks in character it is way more functional and comfortable.

A new hut was under construction during the 2015-16 season.
Take a good look at the Lake Fryxell hut, because it won’t be around much longer.
A new hut was under construction during the 2015-16 season.
Inside the Lake Fryxell Jamesway, with the kitchen area in the foreground.
Drawing left behind on a table inside the Lake Fryxell Jamesway hut.
Renee and I stopped inside the hut for a snack. Someone had passed their down time making an intricate drawing on graph paper, signed, dated and left behind on the kitchen table.
Hut at Lake Hoare
The newer huts will look like the one at Lake Hoare.

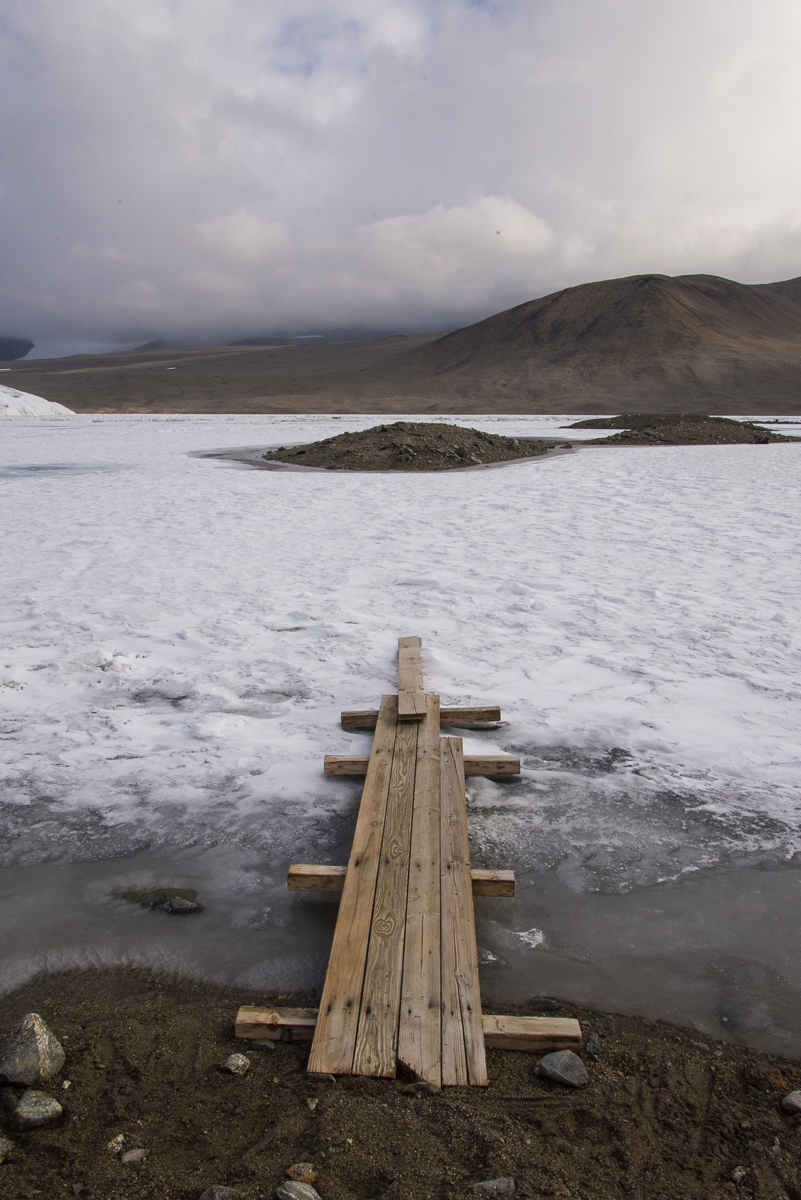
After eating a snack in the hut, we headed for the ATV, which was parked on the thick, permanently frozen layer of ice that covers Lake Fryxell. This time of year, the margin of the lake melts, and is a few feet deep. So how do the limnologists (lake scientists) get onto the ice? The ingenious solution, arrived at with Rae’s input, was to have an aluminum rowboat rigged up so that at either end a loop of rope was attached to the boat. Through those loops runs a very long loop of yellow rope, which is threaded through two pulleys, one set up on shore and one on the ice. Get in the boat, pull the yellow rope hand over hand and the boat travels across the water and glides up onto the ice. It kind of reminded me of the old rope tows at ski areas in the 1960s and ’70s.

Once on the lake ice, we walked to the ATV, pulled out the pan underneath it protecting the ice in case oil dripped from the engine (every effort is made to not have any alien materials enter the environment), and made sure the tires weren’t frozen to the ice. Renee got it started, I straddled the back part of the seat behind her, and off we went.

CanadaGlacier-2015-12-19_409
Pull, pull, pull your boat, gently ‘cross the stream.

Renee drove cautiously, taking care to not drive too close to cracks around the periphery that might indicate unstable ice, and slowing down when crossing rough areas, which we encountered increasingly as we approached the glacier. I was grateful that she took her time and I wasn’t being bounced around on the narrow back part of the seat. Later on, when we were back at the hut, I told her that I’d appreciated her restraint. She burst out laughing and said, “Oh good! I was thinking, ‘She must think I’m such a wimp!'”

Lake Fryxwell lake ice and ATV

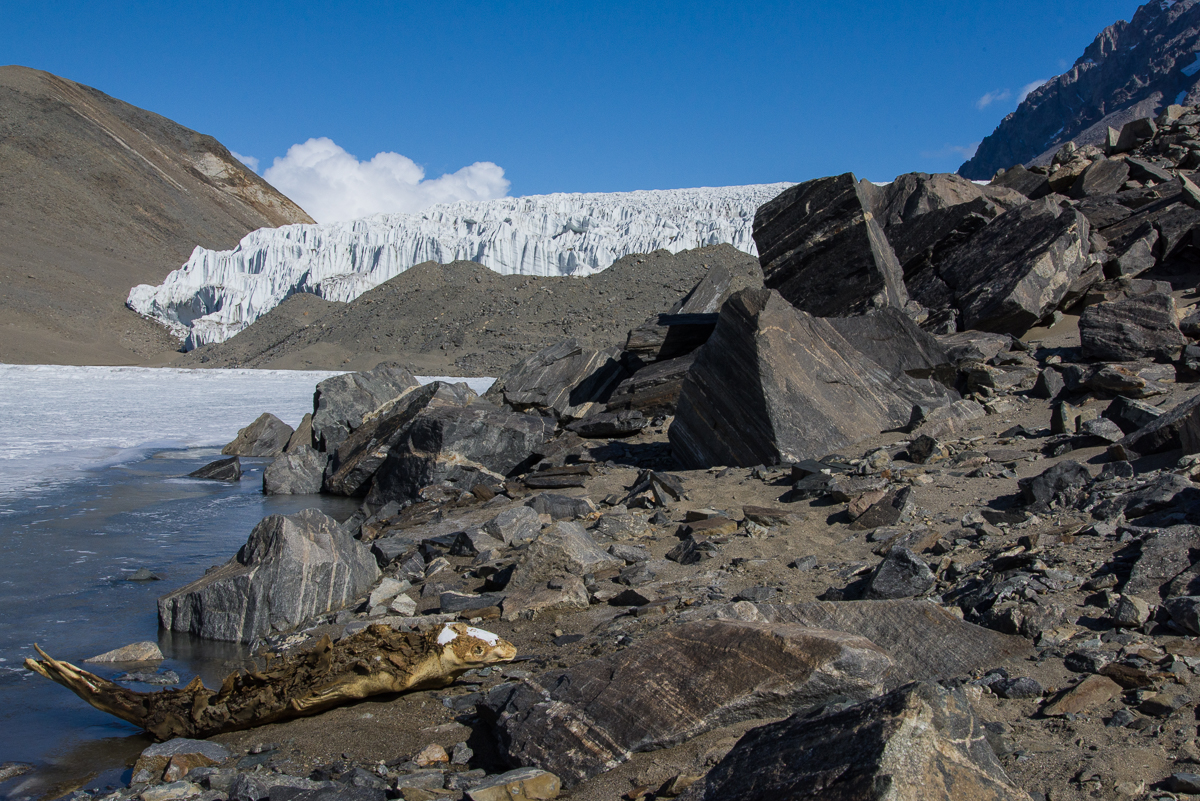
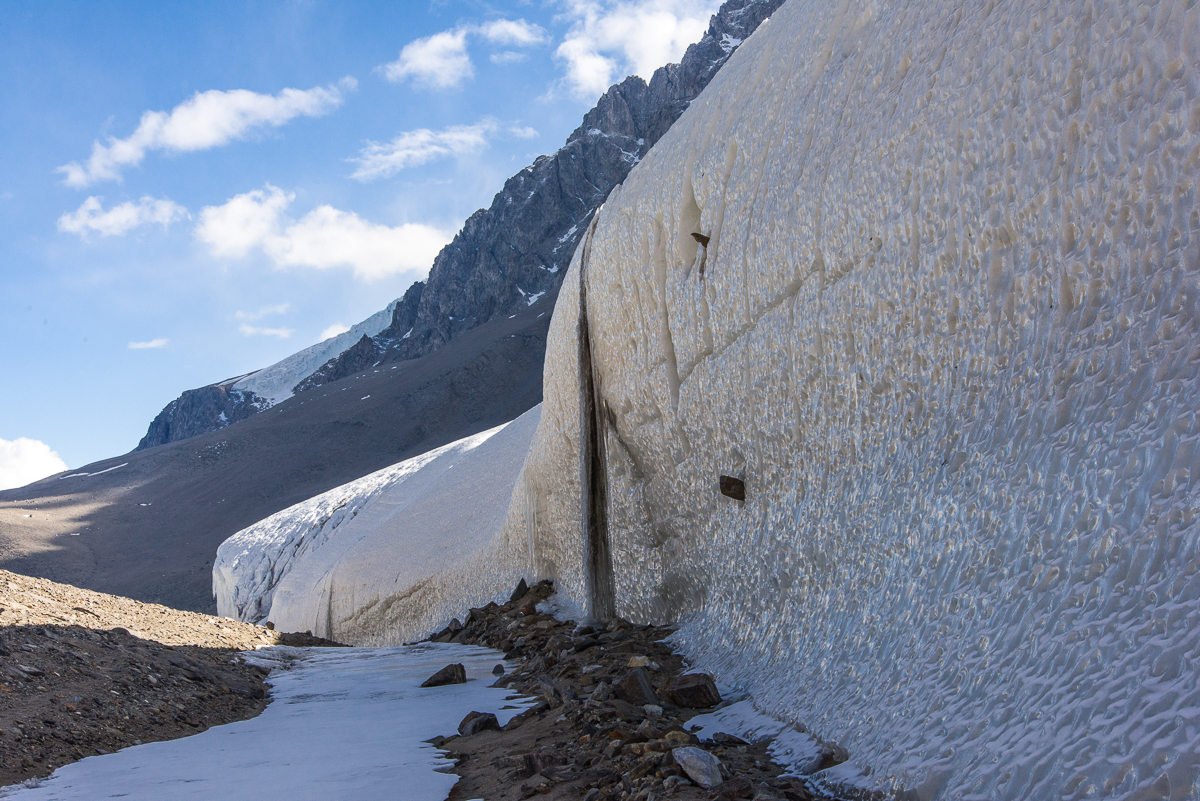
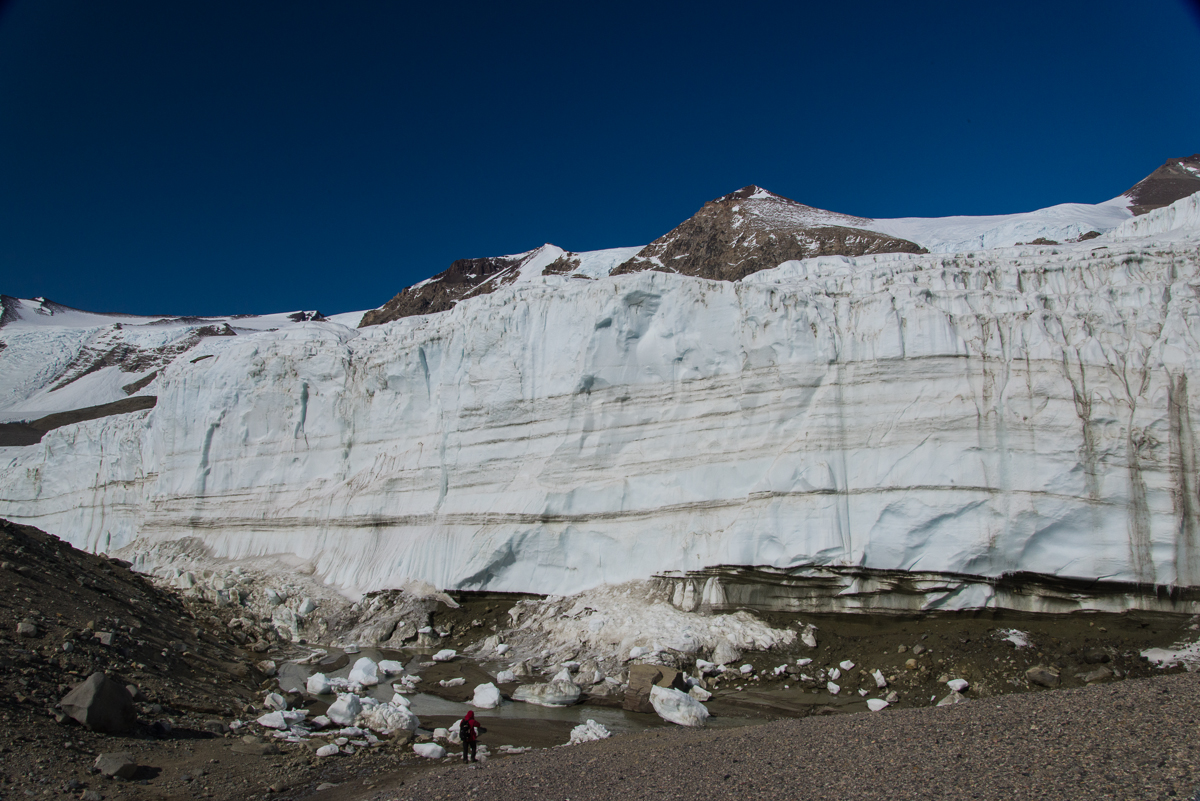
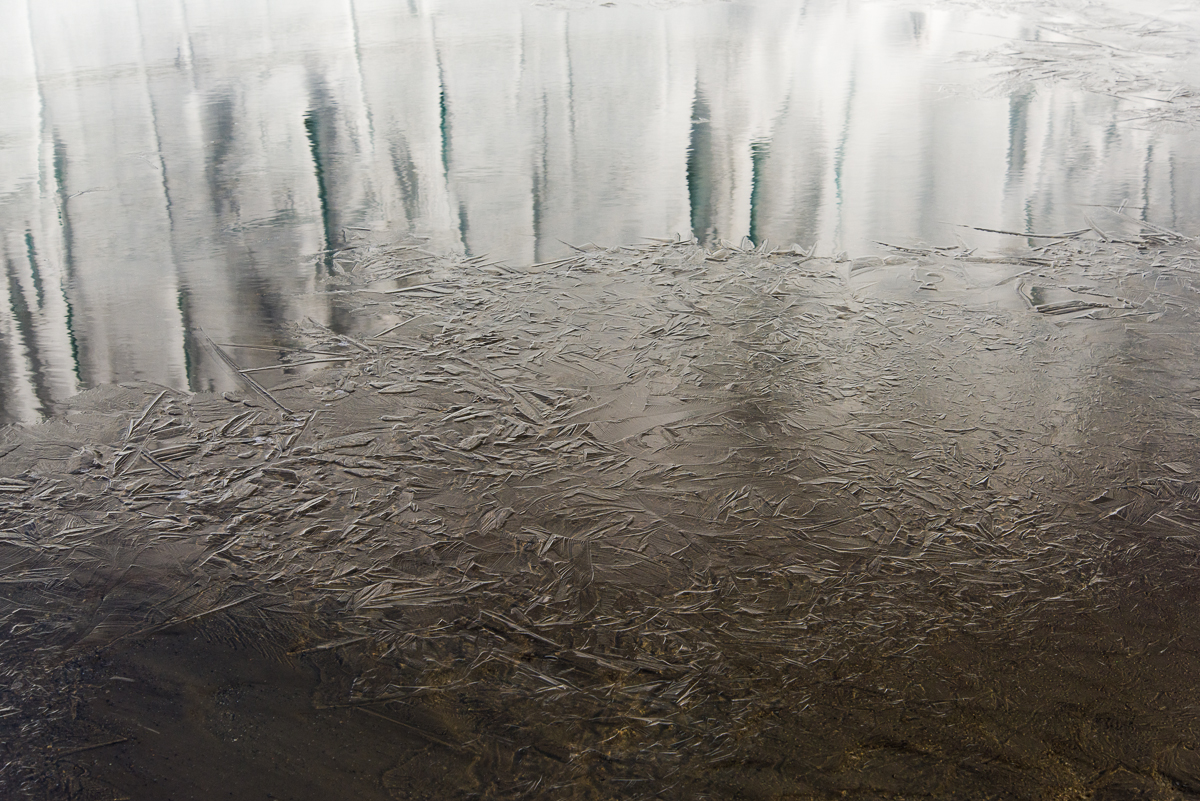
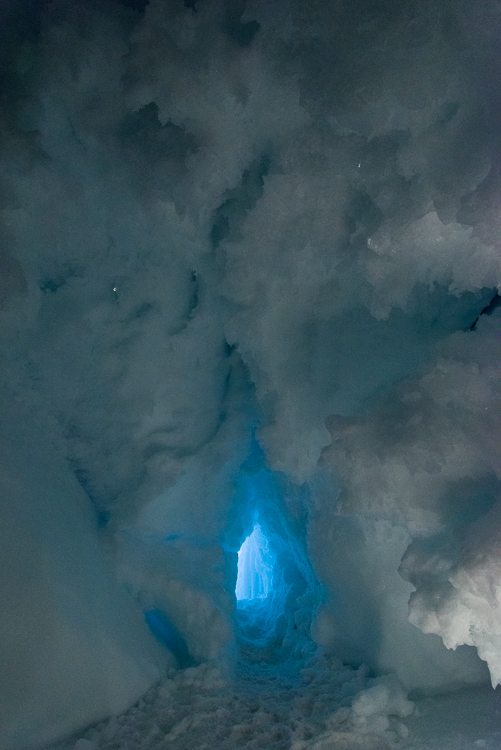
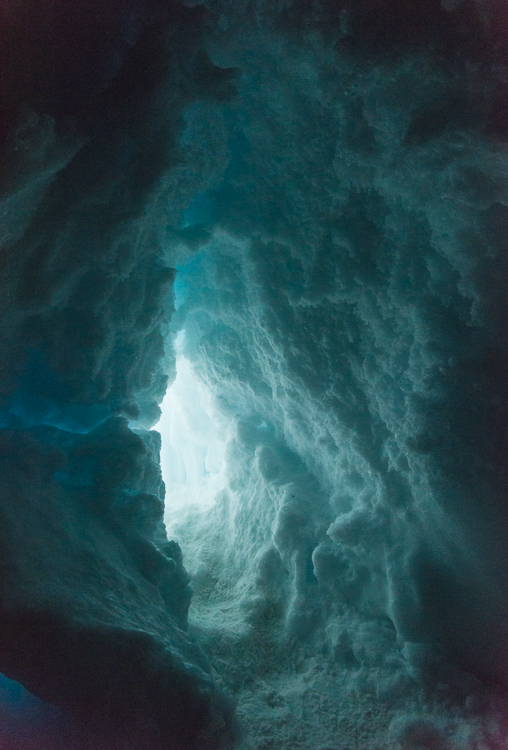
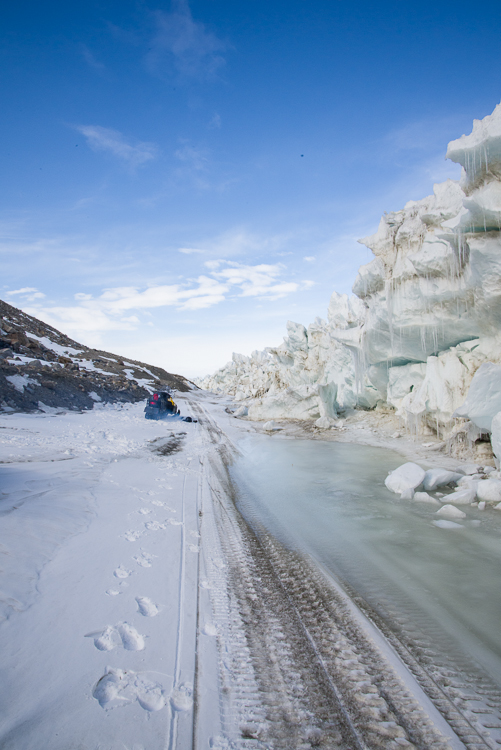
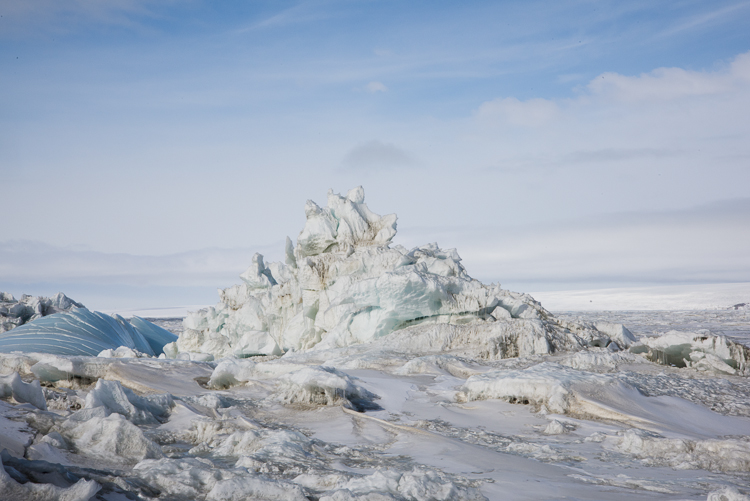
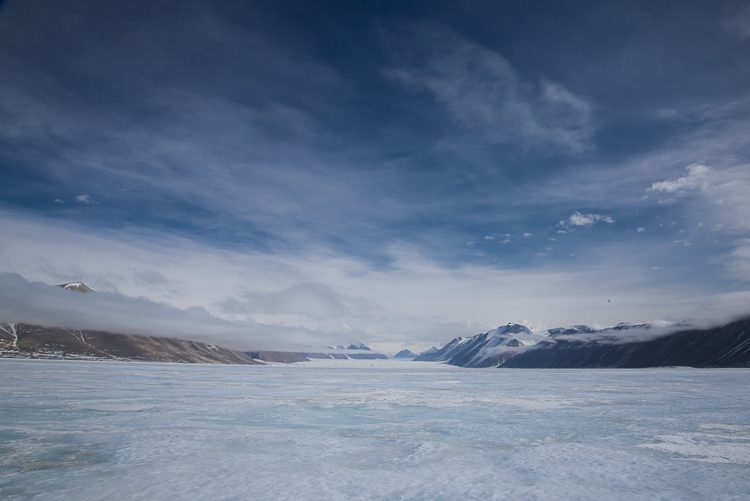
In the distance, Renee waits at the ATV for me to finish photographing the glacier. There were some raised areas of ice at that end, left behind when the rest of the lake ice surface ablated (vaporized). There is nothing as irregular as the ice structures on Lake Hoare, but driving over and around them made for a bumpy ride in places.

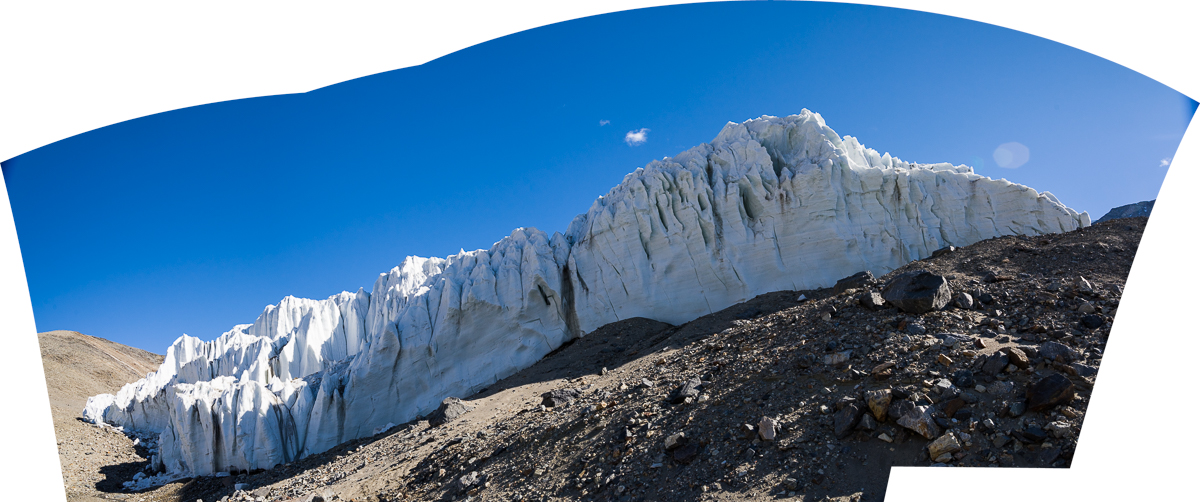
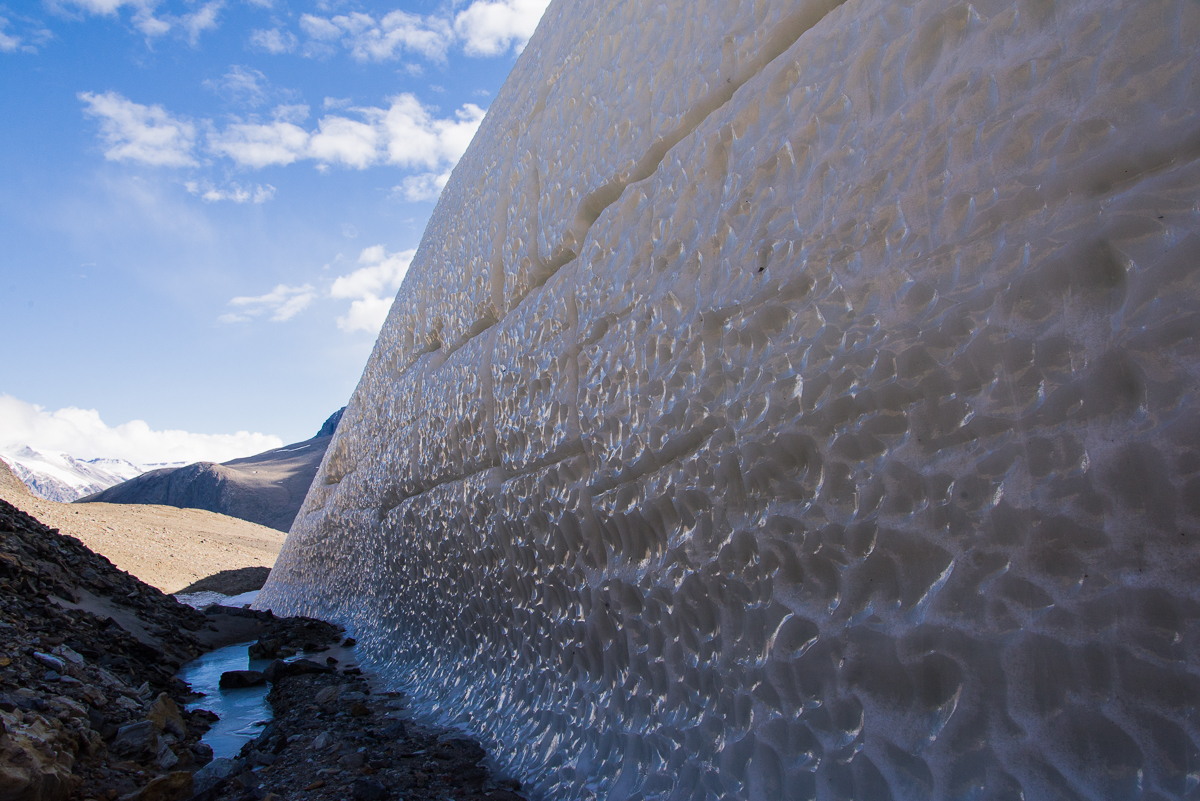
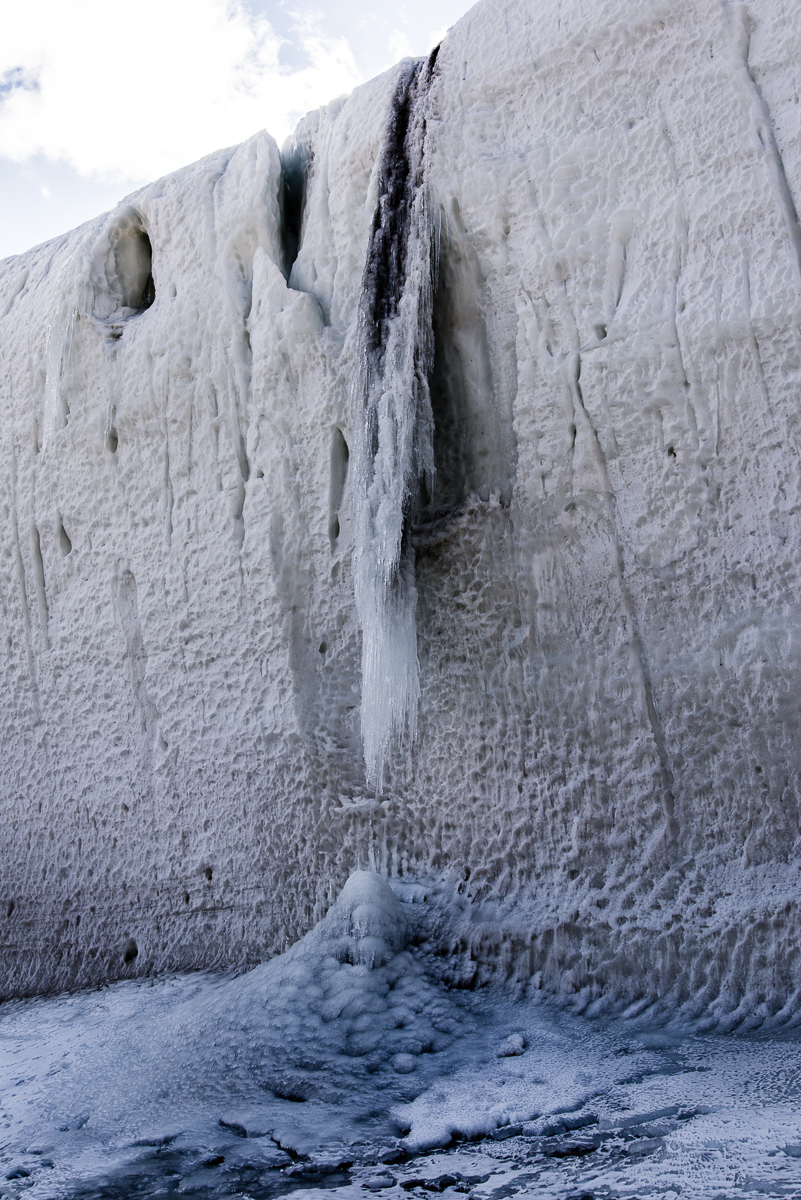
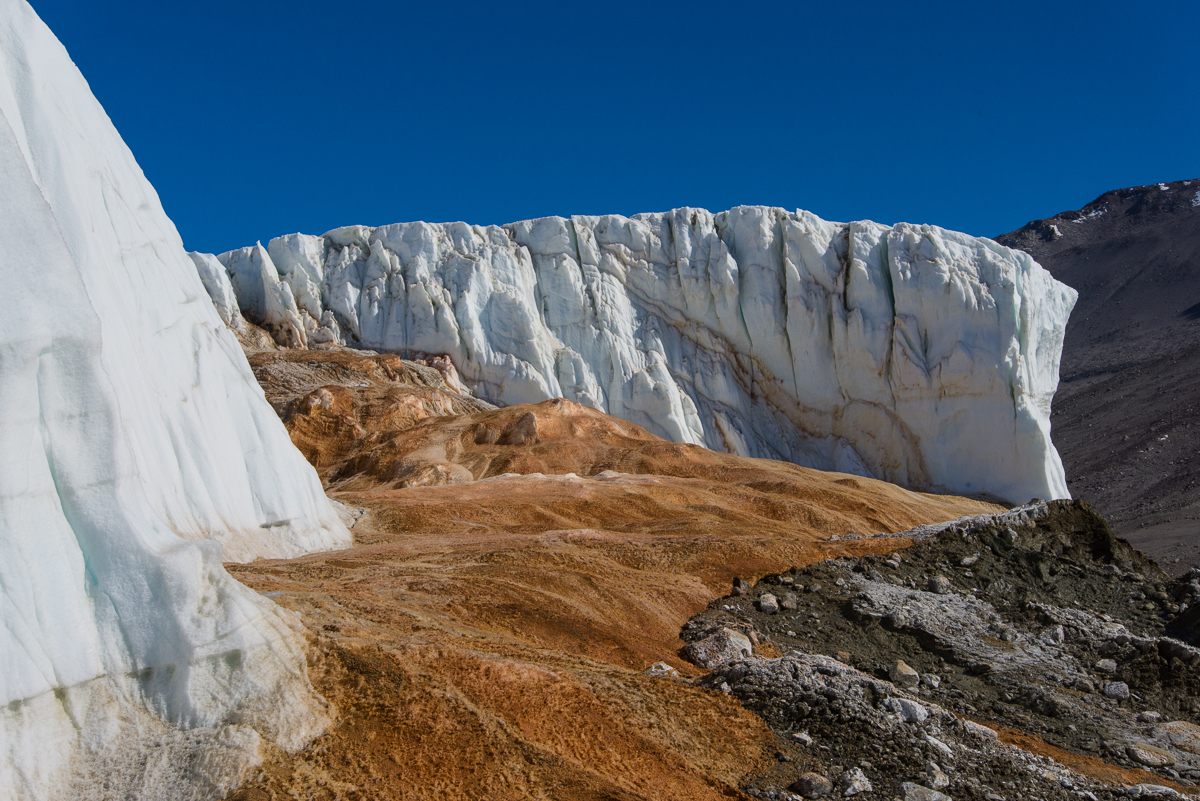
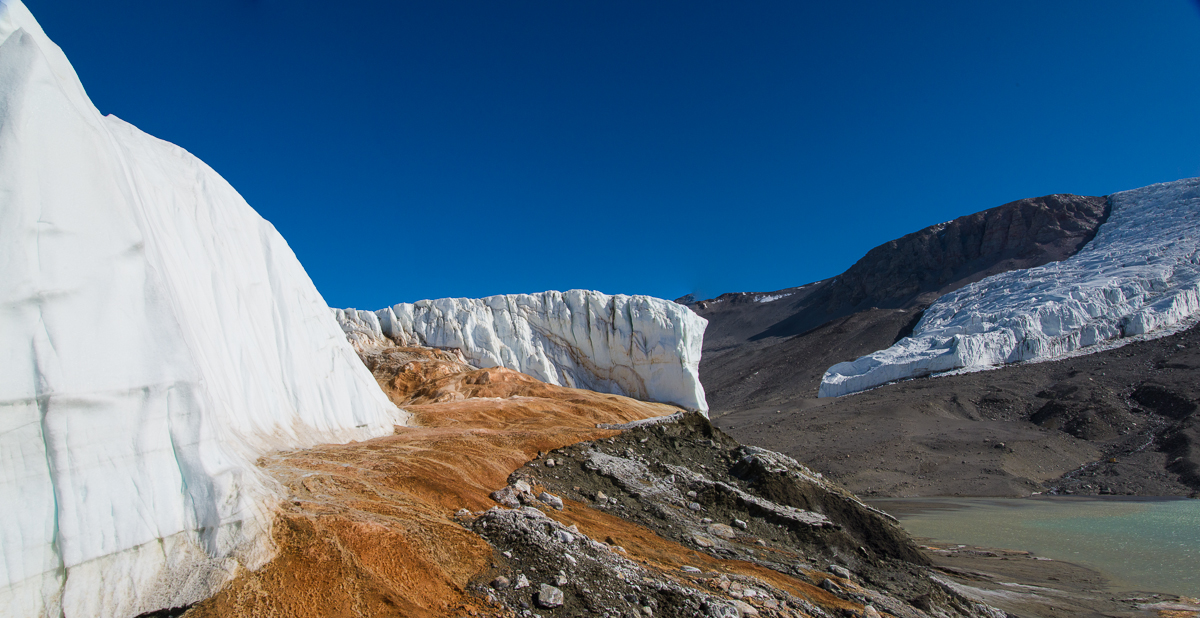
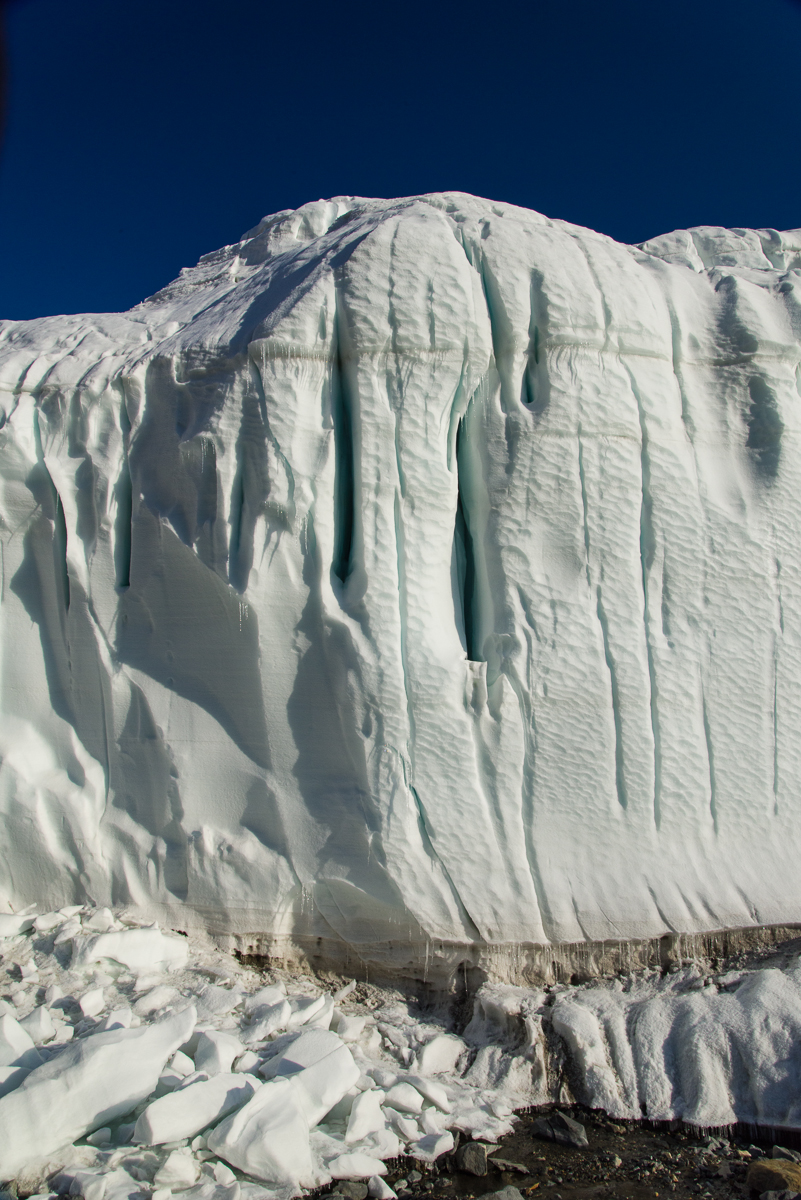
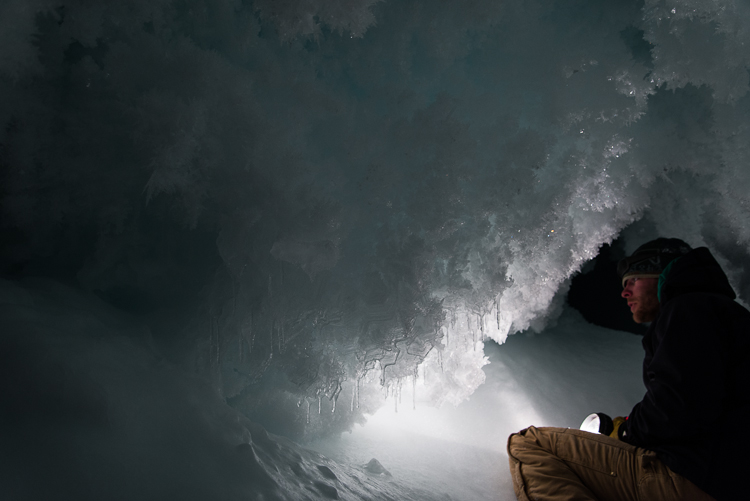
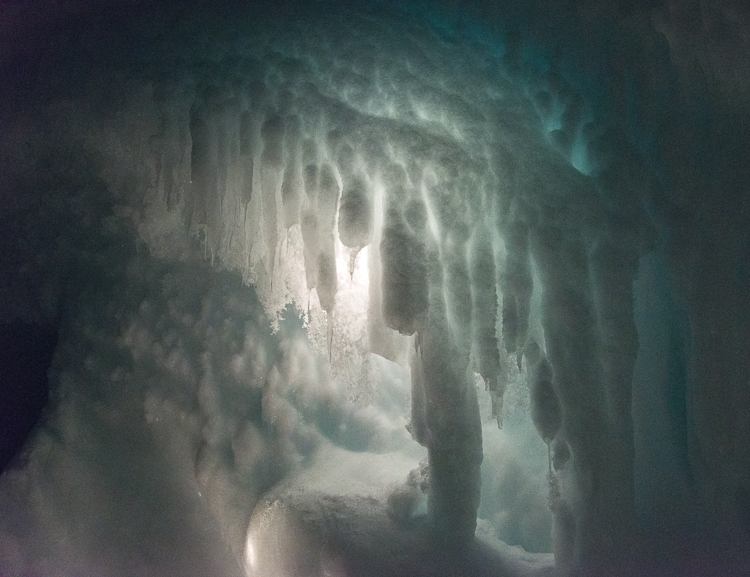
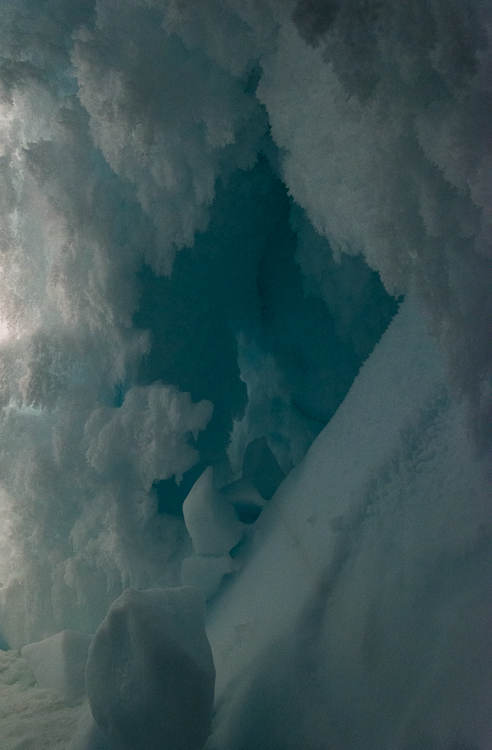
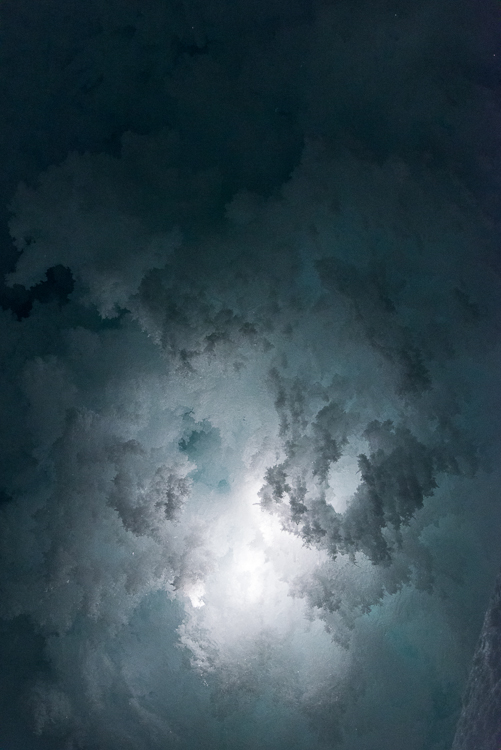
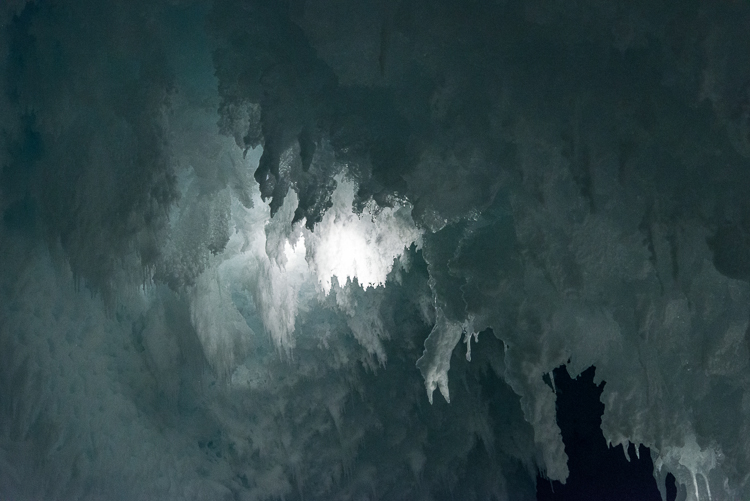
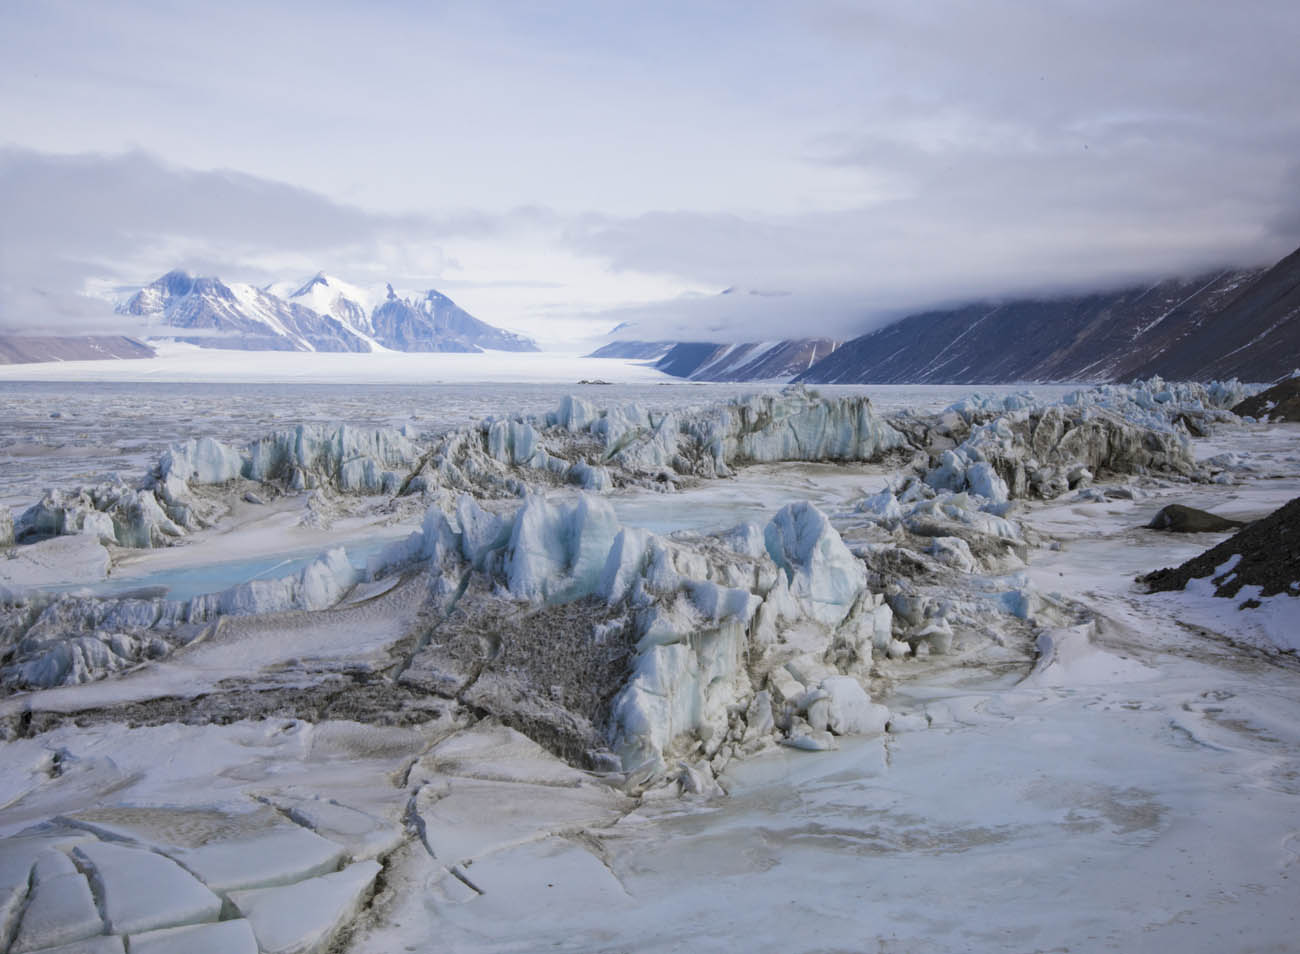
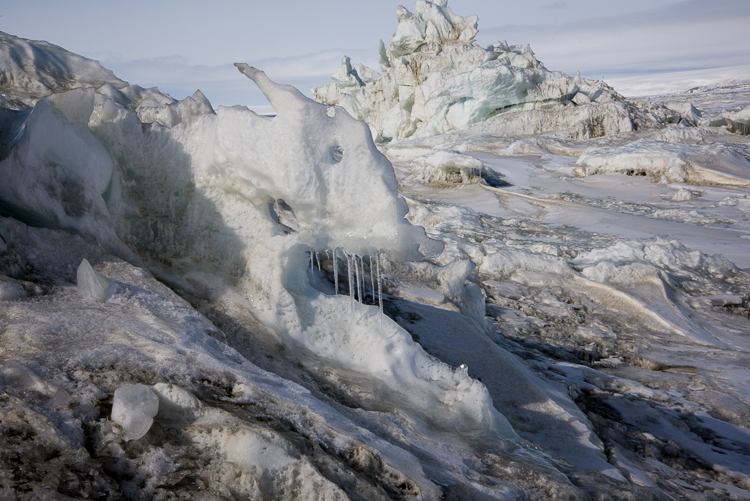
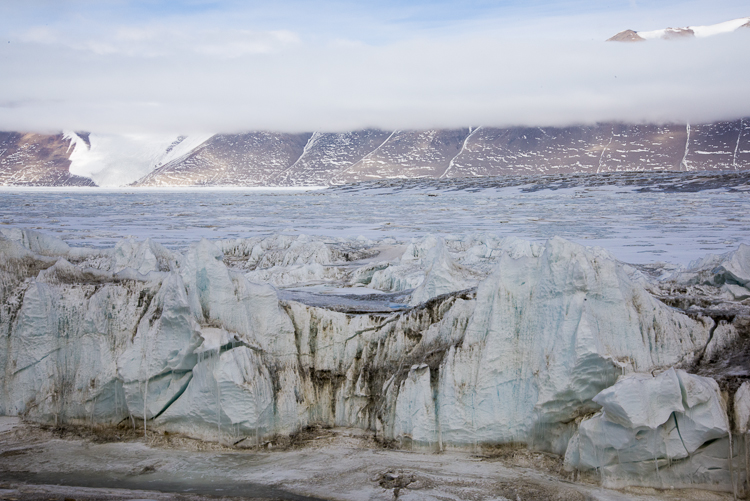
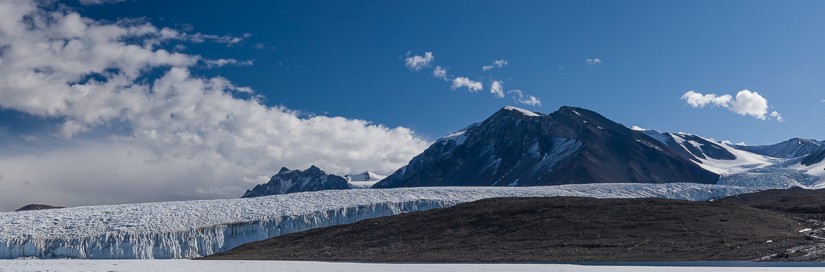
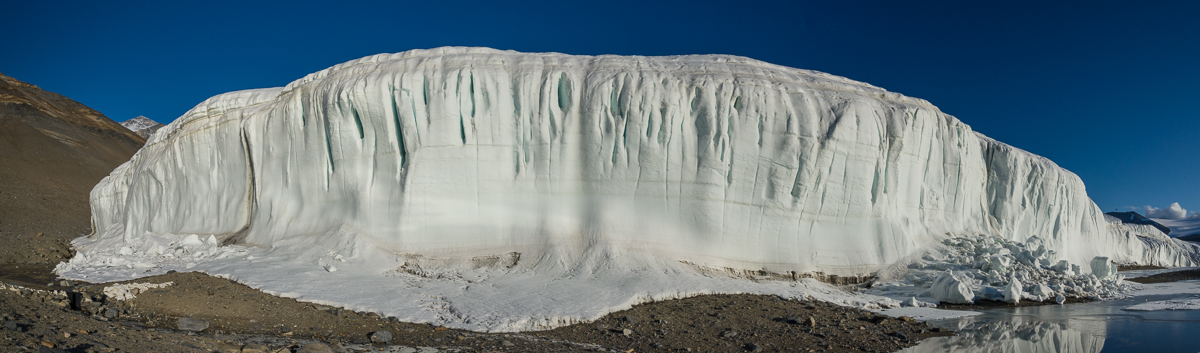
The Lake Fryxell face of the Canada Glacier looks completely different than the Lake Hoare side. For one thing, at its tallest, it’s about twice as high — around 20 meters. That’s because the land slopes beneath it and the surface of Lake Fryxell is actually about 55 meters lower in elevation than that of Lake Hoare. If you look at the second photo from the top of this post, taken from a helicopter, you can see the slope. I am guessing that it’s this downhill gravitational pull as well as the directions of prevailing winds and sunlight that make it look so different — spiky and Gothic with narrow pointy-topped spires, as opposed to the rounded contours on the west-facing side, which get the warmer afternoon and evening sun.

CanadaGlacier-2015-12-19_400
The Canada Glacier as seen from the far west side of Lake Fryxell looks like a packed metropolis of ice steeples.

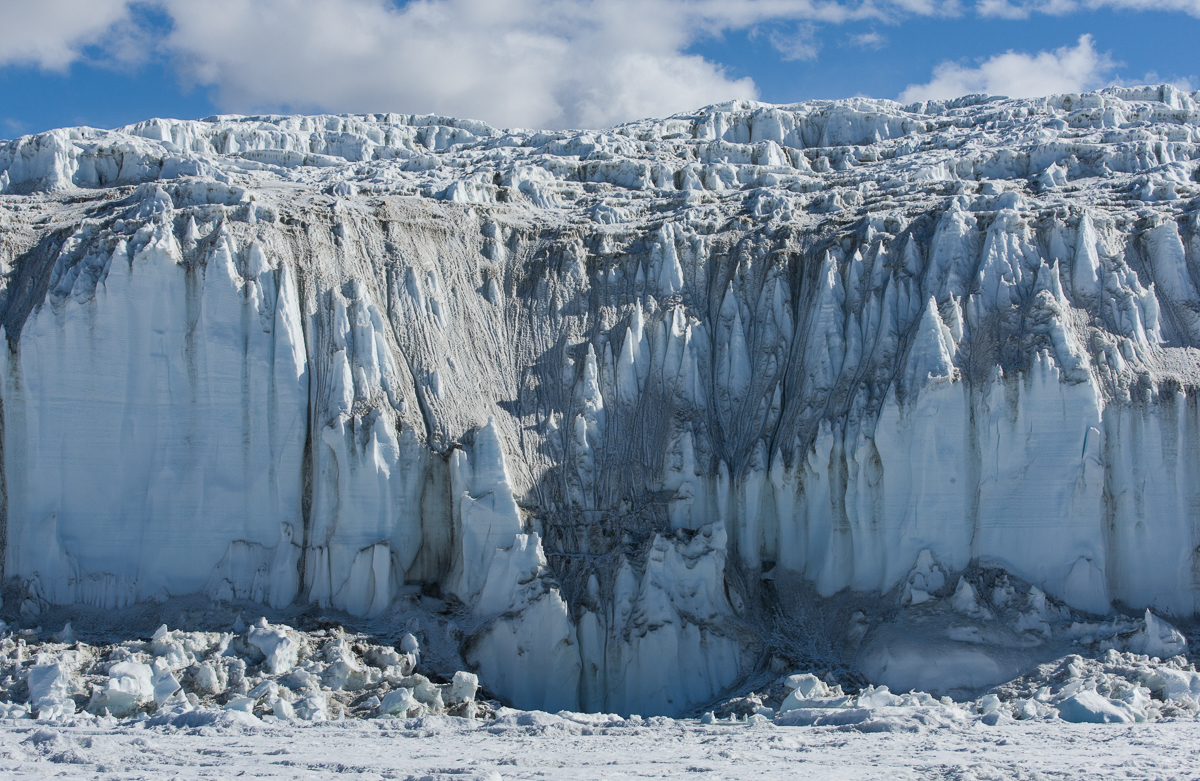
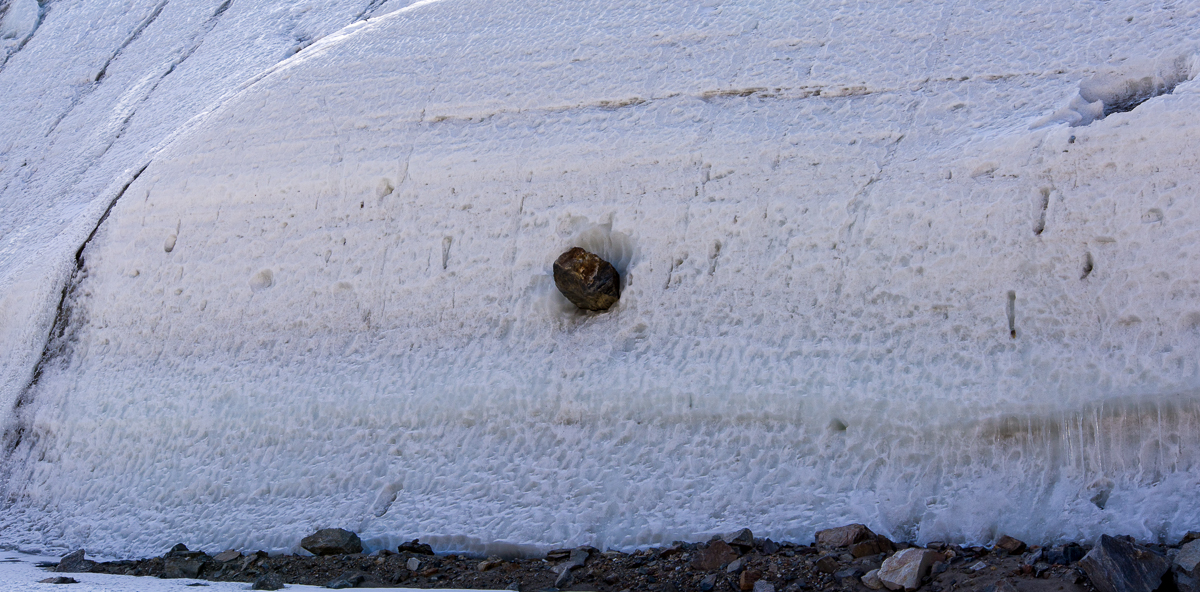
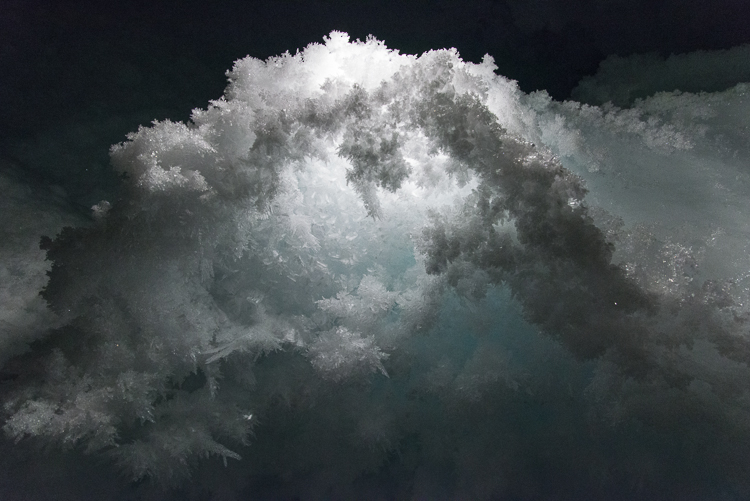
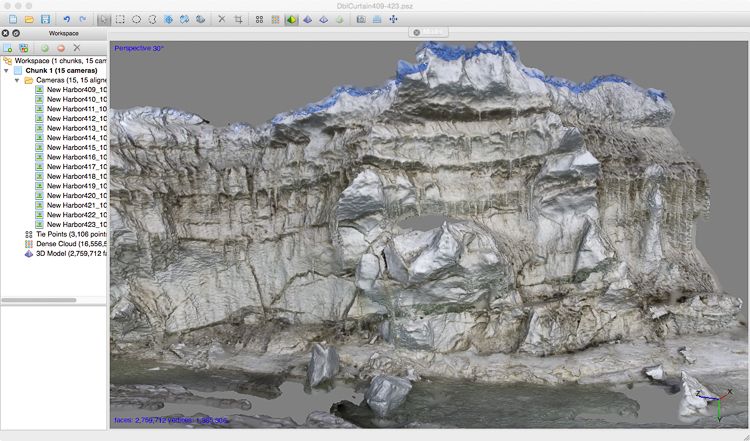
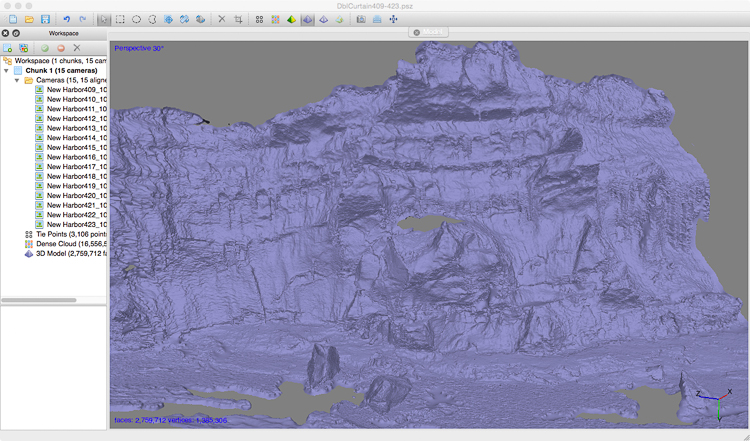
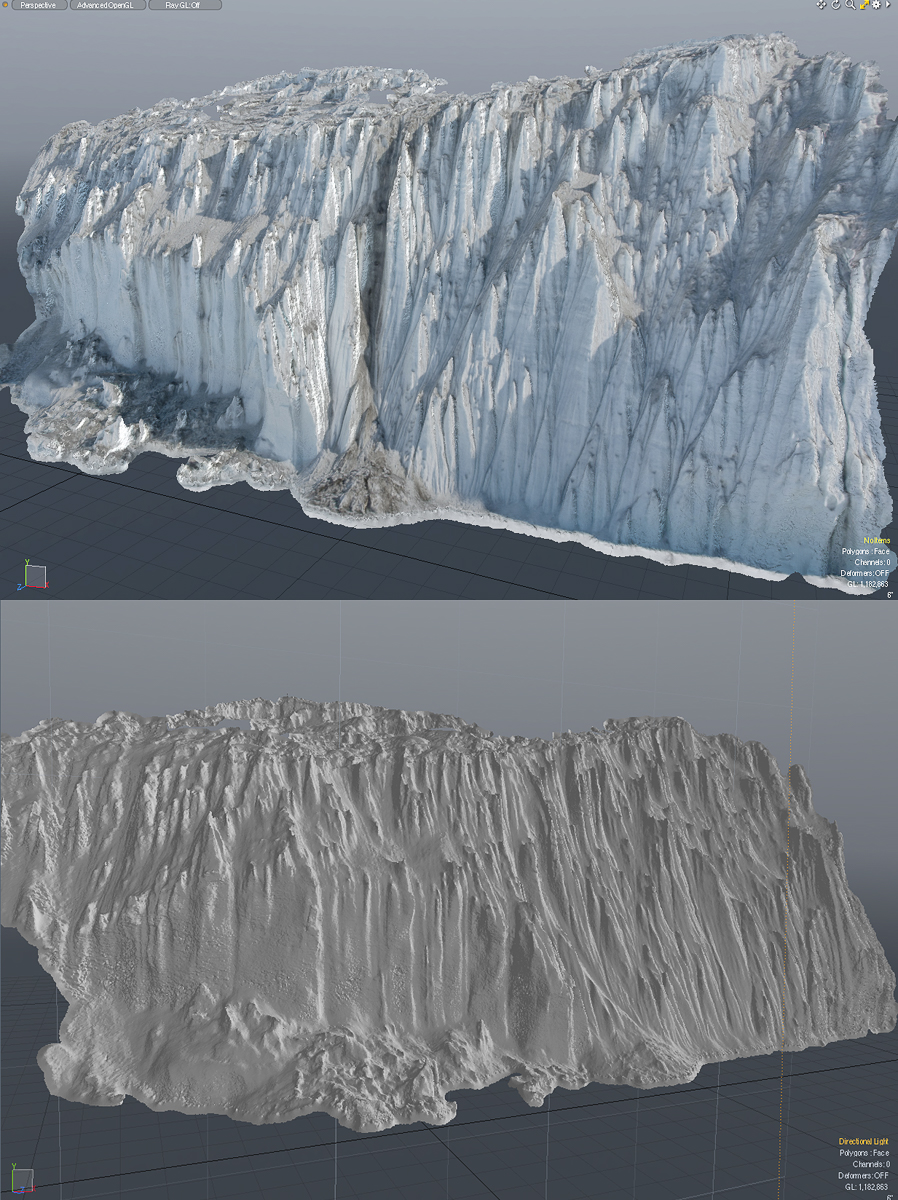
Renee waited patiently while I shot some 300 photos of the glacier side. That’s way more photos than I usually took at a site, because I wanted to see if I could produce a 3D capture (i.e. scan) of the complex surface, and since I hadn’t had much experience tackling something that is both that immense and that detailed, I wasn’t sure how many different angles I would need. So I decided to err on the side of “more than enough.” Eventually some of these 3D captures will be produced as sculpture. (Read more about the process.) Recently I processed one section that I shot that day. It took the software about 18 hours to calculate the relative distances between points to produce a model of the section below, and another few hours for it to generate a polygon mesh, but I’m really pleased — and relieved — with the results. Below is one of the source photos, followed by screenshots of the model.

CanadaGlacier2015-1219_118
Source photo of a section of the Canada Glacier from Lake Fryxell.
CanadaGlacier2ViewsModel
Two screenshots of the model produced by uploading 28 still photos to photogrammetry software. The software also captures the surface color from the photographs. The top view shows the model with that color, the bottom shows the mesh without the color. As you can see, the software was able to figure out the locations of points in space so that you can look at the model from elevated vantage points I did not have, which is pretty remarkable when you think about it. All my shots were taken looking up at it from the lake. I photographed a much longer extent of the glacier so if the software can handle it, I might be able to get and even longer model of that side. I also have photos of a long section of the opposite side yet to process.

After returning the ATV to its parking place, the hike back to Lake Hoare was more challenging than the hike out had been, due to gusty winds that had kicked up. The rowboat tilted to one side while Renee was pulling it to shore and I immediately shifted my weight onto the gunwale to stabilize it, to her great relief (amazing how those instincts kicked in from the long ago days of taking out sailboats at Camp Whippoorwill, when I was 13 ). The sky started to cloud, and on the top of the glacier, the previous day’s snowfall was swirling around, making me even happier to have a pole in my hand to prod the ice in front of me, and also glad that I’d stopped to photograph the ice falls in the morning. Then we walked down the moraine to camp.

All told we’d been out for about eight hours. Photographing — or for that matter doing scientific research — in the Dry Valleys is often very physical, and involves a lot of walking up and down hills while carrying a pack. And I still had a lingering cold the entire time, but was damned if that was going to stop me. Last week a woman who writes a travel blog called me up to interview me about the Antarctica trip. She asked about my formative travel experiences. This got me thinking about the aforementioned Camp Whippoorwill, where I was introduced to hiking and camping in the Adirondacks, and Crossroads America, a cross-country teen tour I took the summer I turned 16. I spent those nine weeks riding around the U.S. in a Ford Econoline van with nine boys and girls and two adult leaders whom I’d never met before the day we started out. All my belongings were in a duffel bag, we camped outdoors almost every night, and we all had to get along with kids at close quarters whom we might not otherwise have chosen as friends.

I’m grateful and maybe a little surprised to arrive at this age with the energy, physical conditioning, and the ability to tolerate a lack of creature comforts and to roll with the inevitable glitches that arise, but I think it goes back to those formative experiences: reaching the summit of an Adirondack peak on a day where you could see for miles, singing to keep our spirits up while we walked in plastic ponchos getting drenched with rain, campfire meals of tuna-rice-a-pea (open cans of tuna, rice, peas and cream of mushroom soup, and stir), picking up my ground cloth after sleeping in the open at the bottom of the Grand Canyon to find a little white scorpion had also spent the night there. Somewhere were planted the seeds of confidence, resilience and determination to push onward until you reach your destination that have never left me. I think my teenage self would have been happy to know that.

New Mexico ghost town, 1971
With one of my fellow travelers in a New Mexico ghost town on the Crossroads America trip, 1971.

The Suess Glacier and the Silver Lining

The Lake Hoare field camp in the McMurdo Dry Valleys, where I spent five days, sits at the east end of the lake right next to the immense Canada Glacier. At the opposite end of the lake is the smaller Suess Glacier. When I first heard the name, it would not have surprised me if a glacier in Antarctica had been named for the children’s book author Dr. Seuss, given the odd landscape features that resemble some of his fanciful illustrations. But no, the 1910-13 British Antarctic expedition led by Robert F. Scott named it for Professor Eduard Suess (1831-1914), a prominent Austrian geologist and paleontologist who helped lay the basis for paleogeography and tectonics.

Lake Hoare looking toward Suess Glacier
View up Lake Hoare from the field camp. The tiny inverted white triangle at the end is the Suess Glacier.

One day I hiked there accompanied by Mari, a young woman who normally worked at McMurdo in the field camp supply center, but was spending a couple of weeks at the Lake Hoare camp assisting camp manager Rae during a particularly busy period of the research season. There are many people in their twenties who work 10-hour shifts, six days a week at McMurdo during the austral summer as dining hall workers, supply staff, janitors, cargo loaders, etc., but their opportunities to travel beyond the base are limited. So Mari was thrilled to be in the Dry Valleys and enthusiastic about hiking to the Suess. We followed a path of sorts that had evolved from the walks of other researchers, which wound around the perimeter of the rocky north shore of the lake (on the right in the photo above).

Mummified seal near Suess Glacier
As we approached the Suess Glacier, we came upon a mummified seal.

After about an hour, we came across a mummified seal. Positioned on its belly rather than laying on its side made it look curiously animated, as if it was in the process of clambering out of the water. The mummified seals strewn throughout the Dry Valleys are an enduring mystery, and one I plan to write more about in a future blog post. Suffice to say, the icy climate and lack of organisms to break down dead animals keeps them in a state of preservation such that it’s difficult to know if that seal has been there a few years or a few hundred.

Gravel hill near Suess Glacier and Lake Hoare
Mari scouts the best path around a large hill of gravel.

As we continued following the lake’s shoreline, we soon reached a very tall gravel hill that blocked our view of the glacier. Mari climbed to the top to scout the best route around it (remarkably quickly, too — it’s hard to get a footing on steep, loose gravel). As you can see in the photo at left, a stream of water was running downhill off the glacier into the lake. Mari had determined there was no shortcut to the glacier from where we were so we continued around the lake side of the hill.


From the Lake Hoare side, the Suess glacier is not nearly as impressive as the Canada Glacier in size or height. This panorama made from three negatives is pretty much what you see as you approach from the lake:

Suess Glacier from Lake Hoare
Panorama of the Suess Glacier from the end of Lake Hoare. The glacier flows downhill from the right and comes to rest against the steep gravel hill on the left.

Walk around to the left of it and you can look uphill to see it flowing from the crest of the hill on the right:

Suess Glacier
The Suess Glacier, looking uphill to where it begins.


But the really good stuff was just around the corner. The Suess flows down one steep hill and comes to rest where another steep hill meets it, forming a narrow passage called a defile. Once you enter the defile, you encounter another side of the Suess, a towering wall of glistening scalloped ice. It glowed with a peachy color reflected off the gravel hill:

Suess Glacier, defile
At the beginning of the defile, looking back toward Lake Hoare, the Suess turns into a wall of wind-scalloped ice and icicles.
Griffith Taylor's sketch of "The Compleat Explorer."
Griffith Taylor’s sketch of “The Compleat Explorer” was made on February 8, 1911, in the midst of exploring the valley that came to be named after him.

One of Scott’s party in the 1910-13 expedition, the geologist Griffith Taylor, described the discovery of the Suess in his 1916 book With Scott: The Silver Lining (you can find the section referred to here on Google Books). The title implies a motivation to spotlight the expedition’s accomplishments and successes, which had been to some degree overshadowed by its sad ending, when Scott and four of his men died on their way back from the South Pole. The following year, World War I broke out and was still raging when the book was published. As the book’s editor, Leonard Huxley, put it in the Introduction, “It is for Mr. Griffith Taylor to tell of the daily life of that company from within, to tell in careless detail its lighthearted cheerfulness lining solid effort, which the cloud of English earnestness so constantly turns out upon the night.” The section on the journey through what is now known as the Taylor Valley exudes the joy of discovery and is illustrated with Taylor’s charming drawings, including a humorous depiction of “The Compleat Explorer” wearing the state-of-the-art cold weather gear for 1911. (This includes “Beard,” which continues to be a popular male accessory in Antarctica. Once somebody said, “You know who I mean? The tall guy with the beard,” and the rest of us started laughing since that did not narrow it down at all.) At any rate, I’m guessing the Dry Valleys were associated with particularly fond memories for Taylor, because along the way Scott informed him he was naming the magnificent Taylor Glacier after him! Taylor’s book also includes his sketch of the Suess:

Suess Glacier by Griffith Taylor
Sketch of the Suess Glacier by Griffith Taylor, made in 1911 when he explored the area with Robert F. Scott.

Taylor and company approached the Suess from the west, i.e. the opposite direction we took. His description remains apt today: “a face of ice forty feet high; but just where it butted into the steep south slope of the defile, there was a narrow gap where thaw-ice had filled in the interspaces between the cliff debris.” Mari and I put on crampons (velcro sandals with spikes on the soles) over our boots to walk on the icy passage where it narrowed to the width of a typical sidewalk.

We walked alongside a wall of ice with such hard, polished surfaces that it looked like it had been cast from a mold:

Suess Glacier, defile
The side of the Suess Glacier bordering the defile is very different in appearance from any other glacier I saw: an icy, dimpled wall. Maybe it has to do with facing the defile, where it gets little sun and the wind is funneled through the narrow gap.

We also encountered the most impressive frozen waterfall I saw anywhere in Antarctica:

Frozen waterfall, Suess Glacier
Freezing the action: a frozen waterfall of ice and sediment was an impressive sight.
Frozen waterfall, Suess Glacier
The other side of the frozen waterfall along the defile.

I was fascinated by the large rocks protruding from the icy wall that had apparently been swept up by the slow-moving glacier long ago. You see a couple of them in the photos of the waterfall above. The one below had to weigh several hundred pounds, and yet was somehow securely frozen in place in its icy niche:

Rock embedded in Suess Glacier
That’s a big rock! And it looks like it’s not going anywhere anytime soon.

Toward the end of the defile, where the narrow space opened up and the glacier height tapered off, another frozen waterfall had formed an ice stalactite and stalagmite:

Frozen waterfall, Suess Glacier
A smaller frozen waterfall gives an idea how the larger one probably looked before it connected into a column.

Once out of the defile, the Suess presents yet another aspect, a frieze of rounded shapes:

Suess Glacier looking north
The icy dimpled surface gives way to a frieze of smoother, rounded shapes.

We reached the end of the defile, and looked down at the small blue lake on the other side (below). It was 5 p.m., we’d been out for four hours and decided to go back to the camp, figuring we’d be there in 90 minutes, just time for dinner. That was the time we decided to take a direct route back across the lake ice which turned out to be, ah, no shortcut at all for us lake ice rookies. If you haven’t read that story, you can find it here. Long story short, we made it back, albeit almost three hours later with wet socks. It was unnerving while we were in the middle of it, but funny once it was over: silver lining!

Suess Glacier and lake.
The west side of the Suess Glacier faces a small lake.


I See Red: A Walk Around Blood Falls

Blood Falls
First sight of Blood Falls from the helicopter.
Blood Falls, Antarctica
Awesome: Looking up from the foot of Blood Falls was an “I’m-in-Antarctica” moment.

The word “awesome” has taken on a casual meaning, approximating something like, “Super cool!” or “Hey, that’s great!” But there were many times in Antarctica I was confronted by something awesome in the original sense of the word, as in awe-inspiring: difficult to grasp in its immensity and power. Even if you learn the scientific explanation, there’s something unfathomable about a large expanse of bright orange and red ice spilling from the end of the steep walls of a glacier that towers overhead. It’s one of those moments where I’d just stand there for a minute thinking, “I’m in Antarctica. I’m really in Antarctica.” That’s how I felt when I stood at the bottom of Blood Falls, at the toe of the Taylor Glacier in the Dry Valleys, overlooking the west lobe of Lake Bonney.

Blood Falls
Rust Never Sleeps: from a vantage point even with the top of the falls.

In those I’m-in-Antarctica moments I felt how privileged I was to even be standing there. Since my Antarctic Artists and Writers Program project involved photographing ice formations to recreate in 3D I was among the fortunate few granted a permit to walk around it, not to mention a helicopter ride to the site. Blood Falls is among the highly protected zones of Antarctica because it is both a rare natural phenomenon and harbors delicate mineral deposits, which in turn harbor unusual microbes, all of which one must take care not to trample. National Geographic’s Blood Falls web page offers a good overview of where the minerals and and their colors come from, and the scientific significance of the site. In brief, the iron oxide salts percolate up into the glacier from a hypersaline lake (i.e. super-concentrated salty water) trapped beneath it from geological processes occurring over a period between two and five million years ago. When the iron salts hit the air, they oxygenate and turn red and orange. This is a dynamic process, and I’m told that the depth of the colors varies from year to year.

Blood Falls detail
The X-Philes live here.

National Geographic goes on to explain that scientists from a variety of disciplines are interested in the microbes who live in the unusually harsh conditions of these deposits: glaciologists (who study glaciers), limnologists (who study lakes), microbiologists (who study microbes) and astrobiologists (who speculate about the presence of life on other planets). As a group, the microbes fall into the broader category of extremophiles because they “are able to withstand and even thrive in extremely harsh environments.” The extremophiles (I like to think of them as the X-philes) of Blood Falls manage the trick of converting sulfur and iron compounds into energy under freezing conditions. Hence the interest on the part of astrobiologists, since this may be the closest Earth can come to approximating conditions on a freezing planet.

Blood Falls
What does the fashionably dressed Antarctican wear to a visit to Blood Falls? Mountaineer guide Forrest McCarthy and I chose Sulfur Orange and Blood Red.

I visited Blood Falls with mountaineer Forrest McCarthy, a veteran of about 20 seasons “on the ice” in the US Antarctic Program. We flew in a helicopter and were joined by Mike Jackson, the National Science Foundation science representative on station for that period. Since Mike’s trip was spur of the moment due to their being room in the helo, he had not obtained a permit. Even an NSF administrator isn’t allowed to walk all the way to the falls without one, so he stayed on a nearby trail overlooking the site, while Forrest and I waded across the shallow but wide melt waters of the Taylor Glacier at the edge of Lake Bonney, which was ankle deep in some places. I had changed into hiking boots instead of bunny boots, so I splashed through the freezing water as fast as I could, hoping my boots were as waterproof as advertised. (They did reasonably well. Lowa boots, in case you’re wondering, from REI. They’re the only ones that come in true narrow widths, so I didn’t have much choice. But they turned out to be great boots.) This was my first view of Bonney, and I knew it was a frozen lake, but I didn’t realize the edges would be swiftly moving water. Or that streams of water would be spilling off the top of the glacier in little waterfalls. I’d never seen a glacier do that before; it seems to be a particularly Dry Valleys phenomenon, where the glaciers are basically grounded rather than actively moving out to sea. (I’ve posted a 13-second video to YouTube.) It was a cold and windy, but sunny day, with a brilliant blue sky.

West Lobe of Lake Bonney
Looking across the west lobe of Lake Bonney from Blood Falls. The water closest to the shore was shallow meltwater coming off the Taylor Glacier.
Taylor Glacier
The side of the Taylor Glacier that is to the right of Blood Falls if you’re facing it from the lake. You can see how massive it is compared to Mike, walking below it (in red parka lower center).


If all goes well, the photos I took during my walk-around can be processed into a 3D file after I return home to recreate this special place as a sculptural form.

Blood Falls
Blood Falls and the Taylor Glacier are in the foreground. Beyond them on the right are the smaller Rhone Glacier and part of Lake Bonney.


Midnight Ramble on the Lake Hoare Shore

Drop dead gorgeous: The Lake Hoare camp is nestled beside the Canada Glacier at one end of the lake. That's the tent where I slept in the center.
Drop dead gorgeous: The Lake Hoare camp is nestled beside the Canada Glacier at one end of the lake. That’s the tent where I slept in the center.

I spent Dec. 18 to Dec. 23 at what may be the most beautiful field camp site in Antarctica. Having seen a grand total of four field camps, I am admittedly not in the best position to judge the fairest of them all, and certainly they all provide fabulous scenery. But when you come out of your tent and towering over you a mere matter of yards away are the glistening white walls of the Canada Glacier with inset vertical crevices of blue ice emitting a turquoise glow, that’s hard to beat. I mean, check out that photo above. That little yellow tent in the middle is where I slept. Now look at the photo below — you crawl out of that tent turn around, and you are that close to it.

Canada Glacier, Lake Hoare
White walls with glowing blue crevices — right outside the tent.

The view down the lake from the campsite toward the Suess Glacier (that light-colored triangle you can glimpse at the end of the lake) is not too shabby either:

Lake Hoare looking toward Suess Glacier
View up Lake Hoare from the field camp.
Lake Hoare main hut
The main hut at Lake Hoare contains the kitchen, a long table for eating and hanging out, cubbies for keeping items you don’t want to freeze, and plenty of space to work at your laptop or the communal computer. Click this or any of these images to see enlargement.

The Lake Hoare field camp is the first to have the vintage Korean-War-era Jamesway huts replaced. You’ve seen the Jamesways in my posts about New Harbor and Lake Bonney. In the near future, word is that all will be replaced with this more functional rectangular design, that allows for more wall storage, higher ceilings, and windows that you could more easily hang curtains on if you wanted to shut out the 24-hour light. Lake Hoare is a busy camp with three small lab buildings, two “rocket toilets” (outhouses with the capability of incinerating human waste and transforming it to non-polluting ash) plus a standard Antarctic camp outhouse as a backup. The camp is presided over by Rae Spain, a 35-year US Antarctic Program veteran who coordinates the various activities of the Dry Valleys LTER camps, which include Lake Bonney and Lake Fryxell — the comings and goings of the researchers, some of whom move from camp to camp throughout the season, the helicopter supply schedules (due to the number of people working in the area there are frequent visits from helicopters, ferrying passengers, food, water, supplies and waste between McMurdo and the Dry Valleys camps as well as short hops between the camps). Rae is an imposing-looking woman, about six feet tall, who wears her hair in a thick braid that reaches to her hips. She’s organized, efficient, and a masterful cook, one night transforming the field camp ingredients into a tasty dinner of Indian curry.  (And in between analyzing soil samples in the lab, Dave, one of the scientists, whipped up some naan dough, which he baked on the outdoor grill to complement the meal. That’s right!) Then there’s Renee, Rae’s assistant and all-around field camp utility player, who, when not occupied with assisting Rae at the hut or the researchers in the field, enjoys baking cookies and other desserts with an attention to detail that would impress Martha Stewart. I digress — but it’s hard not to talk about Lake Hoare without mentioning the food.

Lake Hoare bridge
Thin ice: during the Antarctic summer sometimes you need to use the bridge to get onto the lake ice.

The research at the Dry Valleys LTER centers on the unusual polar dessert ecosystem, with its mostly ice-free terrain, the stationary Canada Glacier (in other words, it’s grounded and not sliding out to sea) and three perpetually frozen lakes: Lake Bonney, Lake Hoare and Lake Fryxell. (Fryxell is on the other side of the Canada Glacier from Hoare.) The lakes are covered with ice that is about four meters thick, in other words, about 13 feet. That’s just the ice — there’s deep water beneath that. Lake Hoare, for example, has an average depth of 30 feet and a maximum depth of 112 feet. This time of year, the ice at the edges, which is over shallower water, melts in the sun, so there are makeshift bridges to get across to the thicker ice without getting your feet wet, like the one shown at left.

Canada Glacier detail
Midnight on a clear night is a great time to photograph this side of the Canada Glacier.

Anyway, late on the evening of the 21st, one by one the camp denizens closed up their laptops, finished their tea or whatever they were doing in the hut and brushed their teeth (field camp life breeds a peculiar intimacy where you floss, brush and spit out your toothpaste into a bucket in front of people you’ve known for all of three days) and went off to their tents to sleep. By about 11:45 p.m. only Dave and I were left, working at our laptops. “The light is really beautiful out there,” Dave remarked. I’d been thinking that I should photograph the glacier in the evening when the light was on it, because in the morning it’s in shadow. The wind was calm, it wasn’t bitter cold, and he was right, the glacier was glowing in the sun against a sapphire sky. So even though I’d hiked to the Suess Glacier and back between 1 and 8:30 p.m. that day, I decided I should take advantage of the conditions and just sleep in the next day. From midnight to almost 2 a.m. I roamed around the campsite taking most of the pictures you see here. The only ones with this post that weren’t taken then are the ones above of the bridge, the hut and the view down the lake toward the Suess Glacier.

Canada Glacier
‘Round midnight: Glacier reflected in a pool of water in the vicinity of the stream gauge. In the foreground is a row of sandbags.
Stream gage box plaque
A metal plaque on the stream gauge box gives pertinent info about the gauge and where to learn more online (click image to read it), as well as noting the box “may be used as emergency shelter by one or two persons.”


This being a LTER (long-term ecological research site) there is a stream gauge to capture the flow of the stream of glacial meltwater that flows down the hill alongside the glacier and into the end of the lake. I came across the above plaque on the side of the gauge box atop one of mounds overlooking the stream, which explains that the stream has a name: Anderson Creek at H1. It also helpfully notes that “This gage [sic] box may be used as an emergency shelter for one or two persons.” That struck me as an odd kind of qualification. What do they mean by one or two? Depending on overall size, shape, interpersonal compatibility and relative degree of distress of said persons? I hadn’t even noticed the gauge before coming across the plaque because it’s tucked behind a mound. It’s not a tall structure so the flow must never get very high:

Stream gage, Anderson Creek H1, Lake Hoare
The stream gauge is in the lower center of the picture.

My initial plan was just to photograph the side of the glacier. But as I was walking around the shoreline, I noticed a lot of beautiful forms in the surface of the lake ice that were thrown into low relief by the light of the midnight sun. Here are a few of my favorites. An NSF glaciologist on station referred me to a lake ice web site where I found some of them:

Ice, Lake Hoare
This is an ice star, also known as an ice spider or ice octopus. According to the lake ice web site, they are holes “associated with water flowing upwards through a hole or crack as the ice sheet is being submerged by the weight of a new snow cover.” We did have a significant snowfall a few days before.


Lake Hoare primary ice
The lake ice web site says this is called “primary ice of the P1 variety” and that it forms in calm conditions moderately below freezing, which is right on target for that day.
Primary ice, Lake Hoare
The lake ice web site goes on to explain, “P1 ice starts as needles growing across a thin, moderately supercooled layer on the surface of the water. They grow until they run into each other. After that, dendritic growth fills in the space between the needles.” In other words, the ice crystals keep branching until they touch other crystals. But it looks like they also grow vertically as well as laterally.
More fun with reflections
More fun with reflections.
Dendritic formations, Lake Hoare
A detail of the above photo so you can get a sense of the complexity and variety of the ice surface. Reminds me of Asian ceramics.
Lake sand, Lake Hoare
A puddle in the stream bed reflects the bright blue morning sky — 1:30 in the morning that is.


Patch of snow above Lake Hoare
This patch of snow was a Rorschach blot that brought back a repressed memory from my childhood.

This patch of snow high on a slope above the campsite (left) never changed the entire five days I was there. I privately referred to it as “The Smoking Monkey.” If you’re too young to remember them, Smoking Monkeys were a novelty item for children during the “Mad Men” era, made in Japan — a little plastic monkey with a set of tiny cigarettes the thickness of a toothpick. Put one in its mouth, light it, and the monkey blew tiny smoke rings. For some reason nobody thought this was an inappropriate toy. You think I’m just blowing smoke? Here’s one that’s for sale on eBay:

Smoking Monkey


Enough about smoking monkeys. I’ll bring this post to a close by waving goodbye:

Glacier and shadow
Glacier with the shadows the stream gauge box and me.


Erebus Ice Cave: The Sequel

Ice cave
On my second visit to the ice cave, I experimented with indirect lighting and got some otherworldly images.
Mt. Erebus
Smokin’ hot: Tuesday you could see that Mt. Erebus is an active volcano, with a little puff of white smoke rising above the crater at the summit.

Tuesday I went out with Evan, one of the mountaineers on staff here, whose assignment for the day was to take me to any icebergs frozen in the sea ice that interested me and back to the ice cave in the Erebus Ice Tongue. We went in Gretel, the same Haagland tractor featured in my sea ice training blog post, so it was lot easier riding around than driving a snowmobile. Snowmobiles are fun, but they get somewhat less fun when you have to travel for an hour on one — your right hand gets tired from being on the throttle, and it’s obviously colder, too, though aside from inside the cave, it was a nice day with little wind. I photographed three icebergs that are frozen in the ice, so you can walk right up to and around them, certainly impossible when they’re floating because it’s too dangerous — a floating iceberg can flip unexpectedly. I’ll post those photos another time, because I haven’t really had time to go through them yet, but I’m certain I’ll get some 3D files from them. Also got to see Mt. Erebus with no clouds and little wind, so you could see a puff of smoke rising above it.

Hexagonal ice crystals
Evan checks out some unusually large hexagonal ice crystals.

Then we went back to the ice cave, and this time, it was just me and him instead of a group of 15 people, and he brought a couple of good lights, which helped me get some better results. It also was a few hours earlier in the day, and it seemed to me there was more light coming through the small opening (very small — you have to crawl through it on your belly). I had learned from the first visit that the flash lit things too evenly. They were nice exposures, but you couldn’t see the depth. Even when I tried notching the flash down, it didn’t look so great. So, we experimented with having him point the lights he’d brought in different places to see what would work best for photography, and I discovered that indirect light worked the best — bouncing it off a wall, backlighting formations, or aiming it so the center of the beam was hidden behind a feature. Aiming the lights in that manner, we lit up some crystalline formations that I hadn’t even noticed the last time I was there, including some very large hexagonal crystals, an inch or more across! This is Evan’s first season here in Antarctica, but he leads winter mountaineering and backcountry ski camping trips in Idaho and Wyoming, and though he was familiar with hexagonal ice crystals he was astonished by the size of these.

Ice cave, hexagonal crystals
A closer look at the giant hexagonal crystals.

Ice cave entrance

Being inside the cave was literally being inside a walk-in freezer so I had to pause periodically to warm up my hands — my glove liners are usually pretty good for photographing but it was very cold in there after a while. Evan showed me some tricks that helped — swinging arms or pumping your hands up and down with your palms facing down. But after we’d been in there for a little over an hour, my fingers and toes had had enough, so it was time to go. But I left with some magical and strange images. They did remind me of some of the photographs I’ve made of cloud formations:

Ice cave

Ice cave

McM_2015-1201-486

Ice cave

Ice cave
A change in the lighting makes this formation look different — see next photo.
Ice cave
A change in the lighting makes this formation look different — see previous photo.

Ice cave

Ice cave entrance
Approaching the entrance there’s a blue glow from the sunlight outside.
Sunlight illuminates the cave walls near the entrance
Leaving the ice cave


The Road to Double Curtain Glacier

Antarctica sea ice
Sea ice pressure ridges looking toward the Ferrar Glacier.
Pair of skuas in Antarctica
What does the skua say?: Haw! Haw! Haw! Haw! Haw!

I’m back from Sam Bowser’s camp — helicopter picked me up at 5 p.m. yesterday. Sam, his wife Laura and the rest of the team were really welcoming and fun to be with, and took me to a couple of fantastic places. I’ve already posted the trip Laura and I made in the previous blog entry.

The next day Sam, Laura and I went by snowmobile to a fascinating scenic spot that doesn’t really have an official name, but unofficially they call it “the road to Double Curtain Glacier.” Comic relief near the beginning of our trip was provided by a pair of nesting skuas standing on a rock. We stopped the snowmobiles and I got out the telephoto lens. They looked at us, and we looked at them, and then another skua flew a few feet above them, to which they responded by cawing loudly, “Haw! Haw! Haw! Haw!” as if to say, “Don’t even THINK about landing here while we’re on this rock.” Then they calmed down, then they started up again. It sounds like someone laughing sarcastically.

Pair of skuas in Antarctica
We must protect this house!
Pressure ridge near Double Curtain Glacier
The “Road” to Double Curtain Glacier has a lengthy section that looks like this, with very high pressure ridges where the sea ice has been pushed up against the coastline.

What we traveled on was not really a road, of course, it’s a flat area of coastline around New Harbor that this time of year is covered with snow and ice, and it looks like someone plowed a flat area of snow for vehicles and left the piles of snow and ice in a very even line on the sea ice side of the lane. What those piles really are is a pressure ridge, which is a ridge of ice pushed up by the movement of the sea ice. I saw such ridges on the McMurdo Sound sea ice when I was doing my training, but they were only a few inches high. I saw them by the New Harbor camp but they were a few feet high. But as we got closer to the Double Curtain Glacier, the lane got narrower and the wall got higher, forming a crazy Baroque facade that I’m guessing was 20 feet high in places! At some point, the road became so narrowed and slanted we parked the snowmobiles and continued on foot.

Scallop shells
Sam was interested in the large numbers of scallop shells that had been carried to the shoreline by the ice.

The ice has begun to melt and form weird shapes of unending variety. You don’t want to walk too close to one of those towers in case it becomes unstable and collapses. The pressure ridges have carried along numerous scallop shells which are scattered in the ice.

Blue wave of ice
One of the odder sights was this blue curving wave of ice. I wanted to get a closer look, but it was hard to tell if the ice was stable enough to walk on, so I dared go no further.
Fang, the ice formation
I named this formation “Fang,” because it looks like a cartoon wolf in profile.

We eventually came to a place totally blocked off with ice. We climbed a little ways up the hill under the Double Curtain Glacier, and saw a mummified seal skeleton and some moss — the first plant life I’ve seen here. 

Ferrar Glacier, seal skeleton and pressure ridge
Mummified seal skeleton on the hillside above the pressure ridge. The Ferrar Glacier is in the distance.
Mummified seal skeleton
Close-up of the seal skeleton. The flipper anatomy is very clear on the right. There is some dried, mummified skin still attached. No telling how long it’s been here; could have been many years.
Double Curtain Glacier
The Double Curtain Glacier emerges from the fog above the seal skeleton. You can see how it has two different leading edges, hence the name “Double Curtain.”
Moss in Antarctica
There was no plant life in evidence except a patch of moss with white salt crystals on top, not far from the seal skeleton. This is a close-up. We took care not to walk on it because it’s very delicate.
Herbertson Glacier
From this elevated spot you get a good look at the Herbertson Glacier beyond the pressure ridge and across the sea ice from the Double Curtain Glacier.

Many of the photos shown here were from that slightly elevated vantage point on the side of the hill. It was a clear day and we could see the Herbertson Glacier (which was directly across the sea ice) and the Ferrar Glacier (to our right from that spot). As we were leaving, we also drove onto the sea ice about halfway between the Herbertson and the Double Curtain and I got another nice photo of the Ferrar.

Ferrar Glacier
The Ferrar Glacier in the distance, as viewed from the sea ice.

I am incredibly fortunate to have been able to visit this place, which one of Sam’s team told me very few people have gotten to see. Unless you are staying at the New Harbor camp, it is relatively inaccessible. I am working right now on processing some of the 3D captures I made there so I can bring back a little bit of the place for others to see. Once I clean up these files I’ll be able to fabricate them as sculptures with a 3D printer or router. I’ve got one capture processed already. Here are a couple of screenshots of it from the 3D file creation program:

3D file of pressure ridge
3D file of part of the pressure ridge, shown with the “texture layer” (the coloration).
3D file, untextured
3D file shown without the texture layer.